How to Apply Wood Veneer to Curved Surface: Easy Guide
To apply wood veneer to a curved surface, start by thoroughly cleaning and sanding the substrate evenly. Ensure no dust, grease, or old finish remains.
Select flexible, paper-backed veneer and cut pieces slightly oversized. Use a thin, even layer of contact cement, allowing it to become tacky before positioning the veneer.
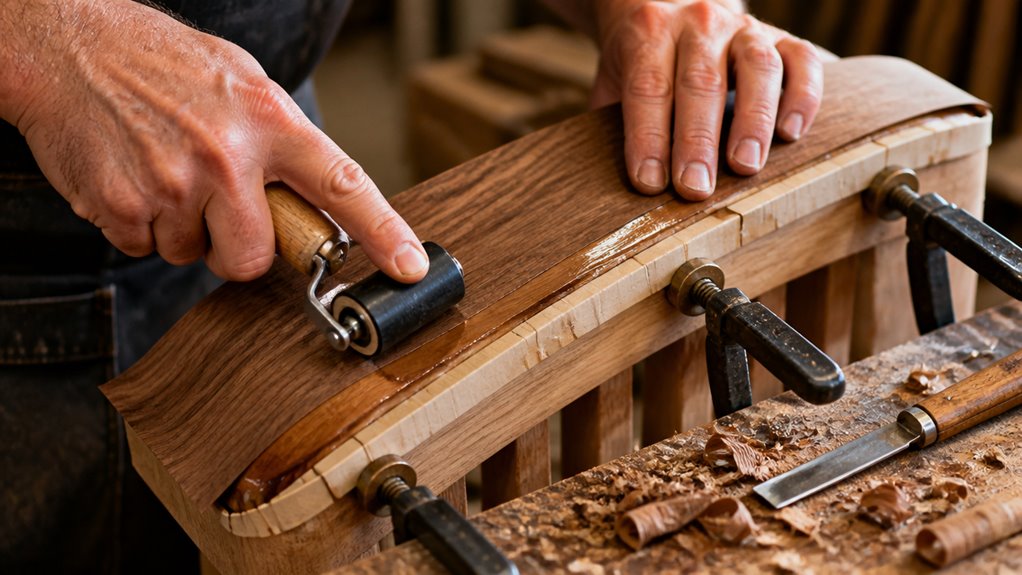
Press it from center outward with a roller. Secure with clamps or jigs for full curing. Mastering these basics guarantees smooth adhesion and visual flow on curves. Explore more for detailed techniques.
Key Takeaways
- Choose flexible, paper-backed veneer and score backing for tight curves to prevent cracking and ensure conformity.
- Sand substrate evenly with 180–220 grit, remove dust and contaminants for optimal adhesion.
- Apply a thin, even layer of contact cement, wait until tacky before positioning veneer on the curve.
- Use rollers or pressure blocks to press veneer from center outward, removing air and ensuring full contact.
- Clamp with padded jaws or flexible straps, maintaining consistent pressure during full adhesive curing time (typically 24 hours).
Get Your Curved Surface Ready for Veneering

Before applying veneer to a curved surface, you need to thoroughly prepare the substrate to guarantee proper adhesion and a smooth finish.
Start by removing any old veneer, glue residues, dust, grease, or loose particles.
Fill dents, dips, and holes carefully; thin veneer will telegraph surface defects if left untreated.
Sand the curved substrate evenly using 180–220 grit sandpaper to create a clean, smooth base.
Maintain consistent pressure along the curve to avoid flat spots or uneven shifts.
Finally, wipe the entire surface with a tack cloth or clean cloth to remove all sanding dust.
Proper preparation secures the veneer bonds reliably and conforms to the curve without imperfections.
Using a high-quality epoxy filler to fill holes ensures strong adhesion and moisture resistance for long-lasting repairs.
This sets a solid foundation for the next steps in your veneering process.
Choose Flexible Veneer and Plan Your Layout
When working with curved surfaces, you’ll want to select flexible veneer, typically paper-backed sheets designed to conform easily to irregular shapes.
Choose flexible, paper-backed veneer for smooth application on curved and irregular surfaces.
Measure the curve precisely and create templates for complex profiles to minimize cutting errors. Cut veneer pieces slightly oversized, allowing room for trimming after adhesion.
Align the grain direction with the curve to maintain a natural visual flow. For tight-radius curves, score the veneer backing at small intervals to enhance flexibility and prevent cracking.
Planning your layout carefully guarantees efficient use of material and ideal aesthetics. Avoid sharp bends that exceed the veneer’s flexibility, as this risks cracking or lifting.
Hackberry wood, known for its exceptional steam-bending performance, is an ideal substrate choice when applying veneer to curved furniture parts.
Pick the Right Adhesive for Curved Veneers
Although choosing the right adhesive might seem straightforward, selecting one that bonds well to curved veneers requires understanding how different adhesives perform on contoured surfaces.
Contact cement is ideal for curves because it creates an instant, uniform bond that conforms to irregular shapes without needing prolonged clamping.
If you prefer PVA glue, make sure you have a vacuum press or clamps to maintain even pressure during curing.
PVA requires moisture and time to set properly.
Heat-activated adhesives, like iron-on veneer glue, offer convenience for certain curved edges but need precise temperature control to avoid weakening the bond.
In all cases, apply adhesive thinly and evenly to prevent lumps or gaps that could cause lifting.
Full coverage is critical to avoid delamination, especially on tight-radius curves.
For enhanced durability, consider adhesives with flexible formulas that can adapt to subtle shifts and stresses on curved surfaces.
Apply Veneer Smoothly: Techniques for Curved Surfaces
Applying veneer smoothly on curved surfaces requires careful positioning and controlled pressure to avoid bubbles, wrinkles, and misalignment.
Start by aligning the veneer precisely, considering grain direction and curve flow.
Once positioned, press firmly from the center outward, using a roller or pressure block to force the veneer into the substrate’s contours.
Work in small sections to allow the veneer to flex without shifting or tearing.
Maintain steady, even pressure to guarantee full contact and adhesive activation, especially with contact cement or heat-activated adhesives.
Avoid rushing; take time to smooth out any air pockets immediately.
If the veneer backs are scored for flexibility, handle them gently to prevent damage.
These techniques help guarantee a clean, seamless bond that follows the curve without defects.
Using properly dried wood and sealing all surfaces evenly can help prevent warping when applying veneer to curved surfaces, as explained in seasonal movement considerations.
Clamp and Jig Veneer for Secure Bonding
To lock in a secure bond on curved veneer, you’ll need to clamp or use specialized jigs that apply even pressure across the entire surface.
Choose clamps with padded jaws or flexible straps to avoid marking the veneer. For complex curves, employ male/female former jigs or curved platen presses that match the substrate’s contour, ensuring uniform contact.
Position the veneer carefully to prevent shifting, then tighten clamps gradually to distribute pressure evenly without causing distortion.
Maintain clamping for the full adhesive curing time, typically 24 hours, to guarantee a durable bond.
Avoid uneven pressure, which can cause bubbles or delamination.
Using a double-cut profile T-track system can help secure jigs and clamps precisely for consistent pressure distribution.
Trim and Finish Curved Veneer Edges
Trim the excess veneer only after the adhesive has fully cured to guarantee clean, precise edges without damaging the bond.
Start by carefully trimming the overhang with a sharp utility knife or veneer saw, following the curve accurately.
Next, sand the edges lightly using fine-grit sandpaper (220 grit or higher) to blend the veneer smoothly into the substrate.
Finally, apply your chosen finish to seal and protect the veneer. To ensure peak results, follow these steps:
- Use a sharp blade for clean cuts; dull tools cause splintering.
- Trim incrementally, avoiding aggressive cuts that risk substrate damage.
- Sand edges evenly to remove roughness and create a seamless progression.
- Apply finish only after confirming full adhesive cure to prevent blemishes or lifting.
- For optimal adhesion and longevity, consider sealing edges with a primer or epoxy before finishing to prevent moisture damage.
Avoid Common Mistakes When Veneering Curves
Before you start applying veneer to those curves, it’s super important to ensure the surface is clean, smooth, and free of any defects.
If you skip this step, those flaws might just peek through and ruin the whole look.
When you get to the adhesive, remember to apply it evenly and thinly.
Following the product guidelines can really make a difference here; it helps prevent those pesky bubbles or spots where the bonding just doesn’t take.
If you neglect these steps, you’re likely to end up with lifting or delamination, which can seriously compromise the durability and appearance of your veneer.
Additionally, maintaining controlled moisture levels in the substrate helps prevent warping and ensures better veneer adhesion.
Surface Preparation Errors
Although surface preparation might seem straightforward, neglecting critical steps can cause veneer adhesion failures on curved substrates.
You must make certain the surface is clean, smooth, and defect-free before applying veneer.
Avoid these common errors:
- Failing to remove old glue, dust, or grease, which prevents proper bonding.
- Skipping dent and hole filling, leading to veneer telegraphing imperfections.
- Uneven sanding that creates flat spots or rough patches, disrupting veneer conformity.
- Neglecting to thoroughly wipe away dust after sanding, which interferes with adhesive contact.
Additionally, using warm, damp rag wiping after sanding can help remove residual dust and improve adhesive bonding.
Adhesive Application Issues
Apply adhesive carefully and evenly when veneering curved surfaces to guarantee a strong, lasting bond.
Uneven glue application can cause bubbles, weak spots, or delamination.
Use a thin, uniform layer of contact cement or appropriate adhesive, ensuring full coverage without excess that can squeeze out.
Avoid applying glue too thickly, as it hinders veneer conformity and curing.
When using contact cement, wait until it’s tacky before positioning the veneer to prevent shifting.
Work in manageable sections to maintain control and reduce wrinkles.
Press the veneer firmly with a roller or pressure block, starting from the center outward to expel air.
Incomplete adhesive coverage or insufficient pressure leads to lifting and failure, so maintain consistent, adequate pressure through clamps or vacuum pressing for the entire curing period.
For any excess adhesive that may squeeze out, use a suitable scraper or solvent to remove it carefully, ensuring no damage to the veneer surface during cleanup with proper scraping tools and techniques.
Frequently Asked Questions
What Tools Are Best for Sanding Curved Veneers Without Damaging Them?
You’ll want to use flexible sanding tools like sanding sponges or flexible sanding pads that conform to curves without causing flat spots.
Hand sanding with 180–220 grit sandpaper wrapped around a soft block or foam pad helps maintain even pressure over the contour.
Avoid rigid sanding blocks, which can damage veneer.
Also, use light, consistent strokes and frequently check your work to prevent thinning or sanding through the veneer’s delicate surface.
How Do Temperature and Humidity Affect Veneer Adhesion on Curves?
Temperature and humidity substantially impact veneer adhesion on curves.
You’ll want to work in a controlled environment.
Ideal temperatures are between 65-75°F (18-24°C) with relative humidity around 40-60%.
Excess moisture can weaken glue bonds and cause veneer swelling.
Too dry conditions may lead to brittle veneer and poor adhesion.
Always acclimate your veneer and substrate to the workspace before bonding.
This ensures consistent moisture content and optimal glue curing.
Can Curved Veneer Be Repaired if It Bubbles or Peels After Curing?
Yes, you can repair curved veneer that bubbles or peels after curing.
First, carefully lift the affected area without damaging the veneer. Clean off old adhesive residue and reapply contact cement or PVA glue evenly.
Press the veneer firmly back into place using a roller or curved platen. Then clamp or use a vacuum press to guarantee full contact during curing.
Trim and finish after the repair cures completely to restore appearance and durability.
What Types of Wood Are Most Flexible for Curved Veneer Projects?
Imagine a Victorian corset shaping wood to your will.
For curved veneer, species like oak, cherry, maple, and walnut are your best bets. They offer natural flexibility and strength.
Birch and mahogany also bend well but may need lighter thickness. Paper-backed veneers of these woods allow easier shaping on curves.
Always test a small piece first to make certain it conforms without cracking. Balance pliability and grain direction for peak results.
How Long Should Veneer Be Acclimated Before Application on Curves?
You should acclimate veneer for at least 24 to 48 hours before applying it on curves. This allows the wood to adjust to your workshop’s temperature and humidity, reducing the risk of warping or cracking during bending.
Store the veneer flat in the same environment where you’ll do the application. Proper acclimation guarantees the veneer remains flexible and stable. This makes it easier to conform smoothly over curved surfaces without compromising adhesion or finish quality.
Flexible Veneer: Adhesive, Clamping, and Trimming Tips
As you press the flexible veneer onto your curved surface, imagine it wrapping like a second skin, smoothly conforming to every contour.
With the right adhesive and careful clamping, you guarantee a flawless bond that holds firm.
Trim edges precisely, avoiding gaps or bubbles, and you’ll reveal a seamless finish that transforms your project.
By mastering these steps, you turn challenging curves into elegant, professional results that showcase your craftsmanship with confidence.