How to Use an Electric Hand Planer? Easy Steps for Beginners
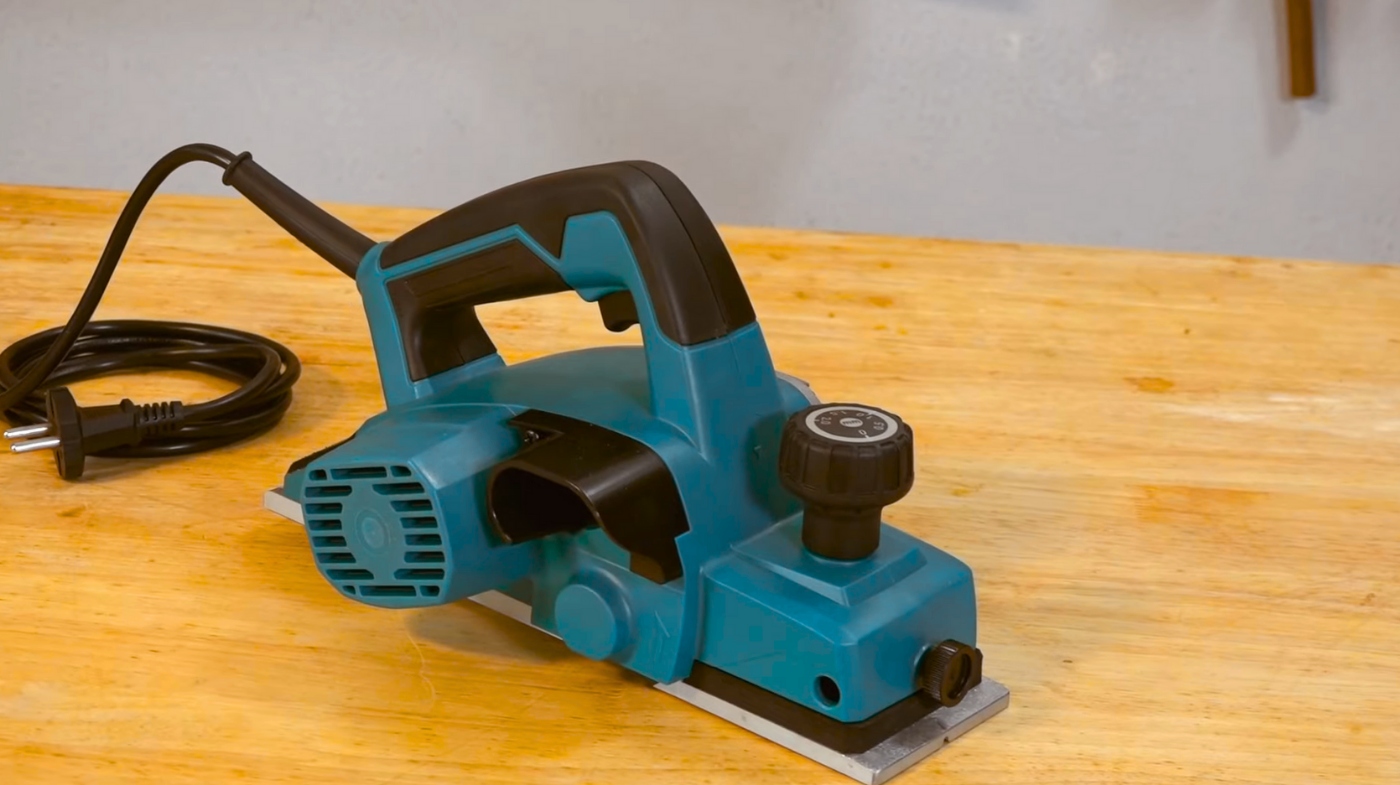
To use an electric hand planer, first secure your workpiece firmly and set the blade depth incrementally for shallow initial cuts. Check that blades are sharp and properly installed.
Hold the planer with both hands, keeping the fence aligned against the edge, then engage the trigger as you smoothly move forward along the grain at a steady pace. Avoid forcing the tool and make multiple light passes for an even surface. Following this, you’ll discover tips for improving precision and safety.
Key Takeaways
- Set the blade depth control to a shallow cut and ensure blades are sharp and properly installed before starting.
- Securely clamp the workpiece and position the planer’s fence flat against the edge for guided, stable operation.
- Hold the planer firmly with both hands, keep a balanced stance, and move it smoothly along the wood grain in a forward direction.
- Make multiple light passes rather than deep cuts, gradually increasing blade depth for a smooth, even surface.
- Connect a dust collection system or bag to the dust port to maintain a clean workspace and improve visibility.
Types of Electric Hand Planers and Their Uses
Although electric hand planers come in various forms, understanding their types and specific uses is essential for selecting the right tool for your woodworking project. Handheld or portable planers, either corded or cordless, are designed for mobility and ease of use on site or benches.
They typically have 2 or 3 blades, adjustable depth controls, and accessories like fence guides and dust ports, making them ideal for flattening, smoothing, and shaping surfaces.
For example, the Bosch PL2632K is highly regarded for its ergonomic design and smooth chamfering capabilities, representing a top choice among handheld models best overall. Selecting a planer with an appropriate blade material can significantly affect the quality and durability of your work.
Benchtop planers are fixed to workbenches, feeding wood through the machine for precise thickness control and repetitive dimensioning. They are suited for larger boards.
Industrial or stationary planers handle high-volume, heavy-duty planing in professional settings. They offer superior power and automation but are impractical for DIY use due to size and cost.
Preparing Your Electric Hand Planer for Use
Before you start planning, thoroughly inspect and correctly install the blade to guarantee sharpness and proper orientation. Ensuring proper blade tension is critical to prevent slippage during operation and maintain blade stability.
Next, set the blade depth precisely using the adjustment controls, starting shallow and increasing as needed for your task.
Finally, connect and verify the dust collection system to maintain a clean work environment and prevent debris buildup. Using an electric hand planer provides portable, efficient operation without the need for manual effort, making it ideal for on-site projects.
Blade Inspection and Installation
When preparing your electric hand planer for use, always disconnect it from the power source and set the cutting depth to zero before handling the blades. Place the planer upside down on a secure surface, loosen the blade screws with the recommended tool, and carefully slide out the blades using a wooden block if needed.
Inspect blades for chips or dullness, flip to the second edge if necessary, or replace if both are worn. Clean the cutterhead with a soft brush or compressed air.
Install blades flat and parallel, ensuring even protrusion, then tighten screws securely. Manually rotate the cutterhead to check clearance and screw tightness.
| Step | Emotion Trigger |
|---|---|
| Disconnect power | Safety assurance |
| Inspect blades | Confidence in sharpness |
| Clean cutterhead | Preparedness |
| Align blades | Precision |
| Tighten screws | Stability |
Depth Adjustment Settings
Since the depth adjustment controls how much material your electric hand planer removes with each pass, setting it correctly is essential for achieving smooth, even cuts. Use the depth control knob or lever to adjust blade exposure, usually by moving the front shoe vertically. The guide determines the blade depth, so ensure it is properly positioned for accurate cutting.
Start with shallow increments, measuring blade projection accurately—typically around 3.8mm for a clean cut. Verify the blade and base are aligned and parallel to avoid uneven cutting. Maintaining cutting accuracy is crucial to achieving professional results and preventing material wastage.
Always unplug the planer before adjusting depth to prevent injury. Test your setting on scrap wood to verify results. Keep the adjustment mechanism clean and lubricated to maintain smooth operation. Address any resistance or wobble promptly to avoid inconsistent cuts and excessive motor strain.
Dust Collection Setup
Adjusting the depth settings accurately sets the stage for effective material removal, but managing the resulting wood chips and dust is equally important for a clean workspace and efficient planer operation.
Start by securely attaching a dust collection adapter designed to fit your planer’s dust port, using clamps to prevent leaks. Match hose diameter to the dust port size—ideally reducing slightly at the planer end—to maintain airflow and prevent clogs.
Use flexible, durable hoses that resist collapse and measure lengths precisely to minimize bends. The original adapter often breaks at its mounting tab due to stress, so ensuring a secure mounting system is critical to avoid damage. Regularly checking connections helps maintain optimal dust collection performance.
Position the dust port adapter at an adjustable angle for unobstructed chip passage and ideal hose routing. Connect the hose to a suitable dust collector or shop vacuum equipped with proper filtration.
Regularly inspect connections and clear hoses to sustain efficient dust evacuation and maintain planer performance. Proper dust collection port sizing and adapter fit are essential to prevent leaks and maximize dust extraction efficiency.
Setting the Depth of Cut and Accessories
Start by adjusting the depth knob to set the precise cutting depth, ensuring gradual material removal for smooth results. It is important to remove only a little material at a time to maintain accuracy and avoid overcutting. Selecting the right cutting performance ensures optimal results.
Next, install guide fences to maintain straight, consistent passes along edges. Finally, attach dust collection accessories to keep your workspace clean and improve visibility during operation.
Adjusting Depth Knob
When you turn the depth adjustment knob, you control how much the front shoe lowers or raises, which directly sets the cutting depth by exposing more or less of the blade. Proper knob identification ensures smooth adjustments and prevents damage to the tool.
Rotate the knob clockwise to increase depth, lowering the front shoe and revealing more blade. Turn it counterclockwise to decrease depth, raising the shoe and exposing less blade.
Adjust in small increments—typically 1/128 inch—for a smoother finish. Set the depth gauge indicator to your desired cut, ideally no more than 1/64 inch per pass, to avoid rough surfaces.
Always test adjustments on scrap material first. If the knob sticks or resists, inspect for worn washers or binding threads beneath. Regular maintenance and using proper tools ensure precise, reliable depth control during planing.
For optimal results, maintain balanced pressure between front and back handles during operation to prevent uneven surfaces and snipe.
Installing Guide Fences
After setting the depth of cut with the adjustment knob, you’ll need to install the guide fence to control the width and accuracy of your cuts.
First, disconnect the planer from power to prevent accidental starts. Attach the parallel guide fence on the side opposite your dominant hand—left side for right-handed users, right for left-handed.
Loosen the lock knob or wing nut, slide the fence to the desired width using the ruler on the fence, then tighten securely. Before tightening, ensure the fence is square by measuring front and back distances and using a carpenter’s square.
Position the fence firmly against your workpiece edge to maintain a parallel cut, and keep the front shoe flat for stability. For accessories like miter guides, follow similar secure attachment and alignment procedures.
Using Dust Attachments
Although setting the depth of cut is crucial for achieving clean, accurate planing, effectively managing dust collection is equally important to maintain a safe and efficient workspace.
Attach dust bags or vacuum adapters securely to the planer’s dust outlet using clamps or keyed fittings to prevent leaks. Use reinforced or custom dust couplers to avoid breakage common with factory parts. Maintaining proper attachment stiffness is essential, similar to how blade stiffness influences saw performance in woodworking tools.
Connect to a high-efficiency vacuum or dust extractor to maximize particle capture. Keep hoses short and free of sharp bends to maintain suction. Regularly inspect and clean attachments to prevent clogs.
Employ dust bags with fine mesh to trap small particles without restricting airflow. These measures ensure both clear visibility and reduced airborne dust, improving safety and tool performance while you work. Additionally, many electric hand planers feature dual dust ports to enhance dust collection efficiency and keep the work area cleaner.
Starting and Operating the Planer Safely
Before you start the electric hand planer, make certain the tool is securely positioned on the workpiece and all safety checks—such as blade alignment and trigger lock status—are complete. This preparation prevents accidents and guarantees ideal performance. Using a featherboard can help maintain consistent contact and reduce the risk of kickback during operation.
Ensure the electric hand planer is firmly placed and safety checks are done before starting for safe, effective use
When operating, follow these key steps:
- Maintain a firm two-handed grip and a balanced stance to control the planer and avoid slips. Use both hands on the tool during operation to maintain control and safety.
- Engage the trigger only when the planer is in full contact with the workpiece; move it smoothly forward—never backward—to prevent kickbacks.
- After releasing the trigger, keep the planer steady until the blades stop spinning to avoid injury.
Always wear appropriate PPE, disconnect power before adjustments, and avoid wet conditions to ensure safe operation. Ensuring proper pressure and stability on the workpiece enhances control and safety during planing.
Techniques for Achieving Smooth, Even Surfaces
When aiming for smooth, even surfaces with an electric hand planer, you need to combine precise depth control, careful material removal, and regular inspection.
Start with a shallow cutting depth, adjusting incrementally to prevent removing too much material or causing snipe. Plane in the direction of the grain, making multiple light passes rather than deep cuts. Using sharp blades enhances cutting efficiency and results in a cleaner surface.
Use winding sticks or straight edges frequently to monitor flatness and detect surface irregularities. This process is made easier because you can slide in material for efficient planing without changing the planer setup.
For cupped boards, plane from the crowned center toward edges, feathering cuts to blend high and low spots. Shift pressure gradually from the front to the rear base to stabilize the tool and avoid gouging.
Finally, fine-tune depth and feed rate to suit wood hardness and grain, ensuring consistent, smooth, and flat results. Regular blade maintenance and inspection can greatly extend blade life and improve overall performance.
Essential Safety Measures While Planing
Because electric hand planers operate at high speeds with sharp blades, you must prioritize safety to prevent injury and equipment damage. First, always wear ANSI Z87.1 approved safety glasses, hearing protection, and a dust mask when planing. It is also important to disconnect power before adjusting cutter heads or blades to avoid accidental starts.
Second, secure your workpiece firmly on a stable platform using clamps—never hold it by hand—and check for nails or foreign objects that could damage blades or cause kickback.
Third, maintain firm control by gripping the planer with both hands on dry, clean, insulated handles, and never adjust depth settings while the planer is running. Additionally, ensure the area is dry and well-lit, and unplug the tool before any adjustments.
Routine Maintenance and Blade Care
Maintaining your electric hand planer regularly guarantees consistent performance and prolongs its lifespan. Always unplug the tool before cleaning or blade changes to prevent accidents.
Use compressed air or a soft brush to clear dust and chips from blades, cutter head, and dust chute. Ensuring proper chip extraction during use also helps maintain cleaner internal components, reducing wear and tear.
Inspect blades for dullness, chips, or cracks; replace damaged blades promptly since carbide reversible blades can’t be sharpened effectively. Tighten blade locking screws securely after replacement.
Clean rollers and feed mechanisms with solvents to remove pitch or debris, ensuring smooth stock feed. Follow manufacturer instructions when replacing blades, positioning them correctly to avoid wood damage.
Store the planer in a dry place, remove blades or use covers, and keep handles clean. Establish a maintenance schedule to inspect safety guards, lubrication, and blade condition systematically.
Tips for Enhancing Planer Performance
Although an electric hand planer can handle tough tasks, your technique greatly influences the quality of the finish and the tool’s efficiency. To enhance performance, focus on precise feed control, proper support, and blade setup.
- Feed control: Always plane with the grain, use shallow passes, and maintain a consistent speed. Shift pressure from the front knob at the start to the rear handle at the end to avoid snipe or gouges.
- Support and guidance: Secure the workpiece on stable surfaces or clamps. Use parallel guides and straight edges to ensure straight, even cuts and prevent chatter. Additionally, the infeed table should move straight up and down to provide uniform cut depth and better precision.
- Blade setup: Adjust blade depth incrementally and keep blades sharp and aligned. Taper blade edges if needed to prevent grooves, and test adjustments on scrap wood for ideal results.
Frequently Asked Questions
Can an Electric Hand Planer Be Used on Painted or Finished Surfaces?
You shouldn’t use an electric hand planer on painted or finished surfaces because it mechanically strips paint and finish, causing chipping, gouging, and damage.
If you must, keep the cut depth minimal and test on a hidden spot first. Use sharp blades and steady pressure, but sanding or chemical stripping is safer for preserving finishes. Always wear PPE to protect against dust and contaminants when working on coated surfaces.
How Do Temperature and Humidity Affect Planer Performance?
You’ll notice thermal deformation can reduce radial runout errors from over 0.05mm down to about 0.005mm after 60 minutes of preheating. Temperature shifts cause uneven expansion in planer parts and electrical instability, leading to inaccuracies and faults.
High humidity raises wood moisture, causing swelling and tear-out, while promoting corrosion on metal parts. To keep your planer precise and reliable, always operate it in stable temperature and controlled humidity conditions.
What Is the Best Way to Store Planer Blades Long-Term?
For long-term storage, you should clean and dry planer blades thoroughly to prevent rust. Apply a thin layer of rust-preventive oil or blade wax before wrapping each blade individually in acid-free or wax paper.
Store them upright in a rigid container with foam inserts or sleeves to avoid blade contact. Keep blades in a dry, stable environment away from humidity and sunlight, and inspect them periodically to maintain their condition and sharpness.
Are There Specific Woods That Electric Planers Cannot Handle?
Ever tried planing extremely hard woods like ebony or lignum vitae with an electric planer? You’ll find they challenge both the blades and motor, causing wear or strain.
Woods with irregular grain, resinous content, or knots can gum up blades or cause tear-out.
How Do I Troubleshoot Common Motor or Blade Issues?
If your motor won’t start, check carbon brushes for wear and test the power switch with a multimeter for continuity. Replace faulty parts as needed.
For blade issues, inspect blade alignment and adjust by loosening pinch bolts, ensuring blades sit properly against the pressure bar. Confirm even blade pressure and secure blades tightly.
Address feed roller grip problems by cleaning or adjusting rollers, and verify all mechanical parts are firmly tightened for smooth operation.
Balance Preparation and Skill for Perfect Planing Every Time
You might start feeling cautious handling an electric hand planer, but soon, precision and efficiency become second nature. While safety demands your full attention, the smooth, even surfaces you create reward your focus.
Setting depths and maintaining blades may seem tedious, yet they guarantee consistent performance and durability. By balancing careful preparation with confident operation, you transform a complex tool into a reliable extension of your skill, achieving professional results every time.

