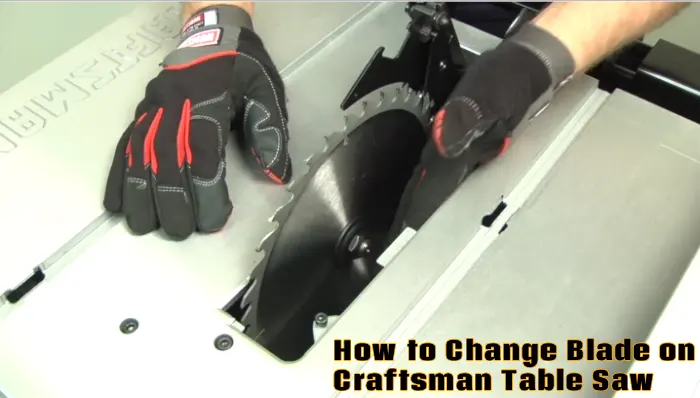
How to Change Blade on Craftsman Table Saw: 7 Easy Steps to Follow
Craftsman’s table saw is well-known and widely used amongst woodworking enthusiasts, novice and expert alike. It offers precise cuts, ensuring you get the desired results at every turn.
As the blade becomes dull after extensive use, you have to know how to change it. I have done my research and grasped all the steps to guide you through this essential maintenance process seamlessly.
Changing the blade on your Craftsman table saw involves a series of meticulously executed steps. You have to adjust the blade to a 90-degree angle and carefully remove the blade guard for clear access.
Afterward, you need to remove the old blade and install the new one with precision to maintain optimal cutting performance. I will take you through each step in detail so you can easily change the blade on your Craftsman table saw.
How to Change Blade on Craftsman Table Saw: Step-By-Step Guide
To change the blade on your Craftsman table saw, you have to follow the steps that I have outlined below:
- Step 1: Unplug the table saw’s power cord
- Step 2: Turn the blade to a 90-degree angle
- Step 3: Remove the blade guard
- Step 4: Take out the table insert and remove the old blade
- Step 5: Install the new blade
- Step 6: Reinstall the table insert and blade guard
- Step 7: Test the setup
Step 1: Unplug the Table Saw’s Power Cord
Before proceeding with the blade replacement process on your Craftsman table saw, you need to prioritize your safety by unplugging the power cord. By disconnecting the power cord, you ensure that the table saw remains completely inactive and can’t be turned on while you’re working on it.
Step 2: Turn the Blade to a 90-degree Angle
After ensuring the table saw is unplugged for safety, proceed to turn the blade to a 90-degree angle. To do this, start by loosening the blade-tilt locking knob. This will allow you to adjust the blade to a right angle.
Make sure to carefully rotate the blade until it’s perpendicular to the table surface. Take your time to ensure the blade is perfectly aligned before proceeding.
Once you have achieved the desired position, tighten the blade-tilt locking knob securely. This will keep the blade in place during operation.
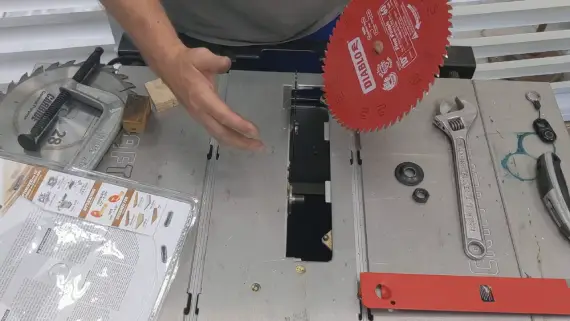
Step 3: Remove the Blade Guard
After setting the blade at a 90-degree angle, you’ll need to remove the blade guard. You’ll need to raise the blade to its highest cutting position.
To raise the blade, use the elevation handwheel located on the front of your Craftsman table saw. Once the blade is at its highest position, press the red button on the guard and carefully lift the entire blade guard assembly off the riving knife.
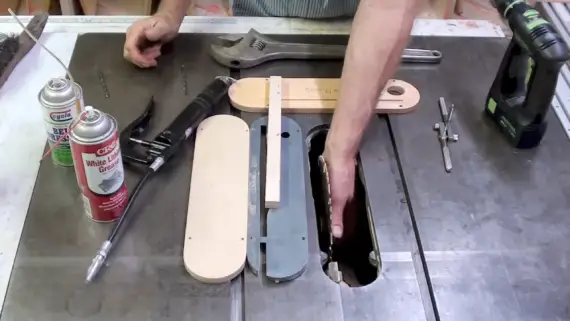
Step 4: Take Out the Table Insert and Remove the Old Blade
Next, you’ll need to remove the old blade from the arbor. To remove the old blade on your Craftsman table saw, begin by inserting a slot screwdriver into the large hole in the table and carefully prying out the table insert. This will allow you to access the blade and safely remove it.
After removing the table insert, you can proceed to remove the old blade. Use the two blade wrenches that were supplied with your table saw to loosen the blade arbor nut. Make sure to turn the nut counterclockwise to loosen it.
Once the nut is loose, you can remove the outer flange washers and then take off the old saw blade from the arbor. Be cautious when handling the blade to avoid any injuries.
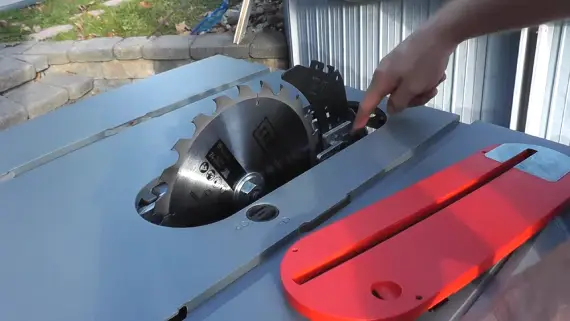
Step 5: Install the New Blade
With the old blade removed, you can now proceed to installing the new blade on your Craftsman table saw. Begin by positioning the new blade on the arbor, ensuring that it aligns with any directional arrows on the blade.
Next, re-install the flange washer and securely tighten the arbor nut. To do this, make use of the two blade wrenches that are provided with the table saw. You need to tighten the arbor nut firmly but be careful not to overtighten it.
Step 6: Reinstall the Table Insert and Blade Guard
After successfully installing the new blade on your Craftsman table saw, proceed to reinstall the table insert and blade guard assembly.
Take the table insert and carefully push it back into the top of the table, ensuring that it fits snugly in place.
Next, locate the red release button on the blade guard and press it while positioning the blade guard assembly onto the riving knife. Ensure the blade guard assembly is securely fastened and aligned with the blade.
Step 7: Test the Setup
After successfully reinstalling the table insert and blade guard assembly, the next step in testing the setup of your Craftsman table saw is to plug in the power cord and turn on the saw.
Once the power is on, carefully observe the blade for any signs of wobbling or unusual vibrations. Cut a wood piece to test the accuracy. A stable and steady blade indicates a successful blade change.
If you notice any abnormalities, be sure to turn off the saw immediately and double-check the blade installation.
Testing the setup lets you confirm that the blade is securely in place and ready for use. With a properly installed and tested blade, you can now confidently begin your woodworking projects.
After cutting, you have to clean the table saw top. Removing sawdust and debris ensures a clean working surface.
What blade size is typically used on a Craftsman table saw?
Craftsman table saws typically use a 10-inch blade for a balance of versatility and cutting capacity. This size is widely available and is a standard choice for many Craftsman table saw users.
The 10-inch blade offers a good balance between precision and power, making it suitable for various woodworking tasks. It provides the necessary cutting capacity to handle a range of materials while still allowing for accurate and precise cuts.
How many teeth does a Craftsman table saw blade typically have?
Craftsman table saw blades typically come in various tooth counts to cater to different cutting needs, offering versatility and precision in woodworking projects. These blades are available with tooth counts of 24, 60, and 80.
A blade with 24 teeth is considered coarse and is ideal for rough cuts like ripping. If you need a balance between speed and precision, a blade with 60 teeth is the way to go. It can handle a range of woodworking projects.
On the other hand, a blade with 80 teeth is finer and excels at producing smooth, clean cuts. This makes it perfect for tasks that require a high level of precision, such as cross cutting.
Change Your Craftsman Table Saw Blade with Ease and Precision
Changing the blade on your Craftsman table saw is a simple process that goes in just 7 easy steps I have described. Plug off the power, adjust the blade, remove the guard, and carefully replace the blade to maintain optimal cutting performance.
Be mindful of the blade size and teeth count to suit your specific woodworking needs. Also, always remain vigilant about table saw kickback, a potential safety concern. Ensure proper blade alignment, use appropriate push sticks, and follow safety guidelines to minimize the risk of kickback during operation.
Prioritize safety to make your woodworking experience both productive and secure.