Why Does My Miter Saw Cut Crooked: 9 Possible Reasons and Solutions
If you’ve been using your miter saw and noticed that your cuts are crooked, you may wonder what’s causing the problem. Many factors can contribute to this issue, from a misaligned blade to a warped rail. Understanding these causes and how to fix them is crucial if you want to regain the accuracy of your cuts.
The most common cause is fence and blade misalignment, where the fence and blade are not perfectly parallel, leading to inaccurate cuts. It could also be bowed or misaligned rails, which can throw the saw off course. Also, a slightly warped or damaged blade can also contribute to crooked cuts.
Today we’ll discuss the possible reasons behind this pesky problem and provide you with the knowledge and expertise to fix it. So, let’s get started.
Why Does My Miter Saw Cut Crooked: Possible Reasons
If you’re finding that your miter saw is cutting crooked, there are several possible reasons for this issue, such as:
- Fence and blade misalignment
- Rails bowed or misaligned
- Slightly warped or damaged blade
- Incorrectly installed blade
- Inadequate blade-cutting capacity
- Misaligned bevel gauge
- Misaligned miter gauge
- Unstable workpiece
- Uneven pressure
Let’s discuss these reasons in detail:
1. Fence and Blade Misalignment
Ensuring the fence and blade are perfectly aligned is necessary for accurate cuts on a miter saw, but when the fence and blade are not properly aligned, it can result in crooked cuts.
The alignment between the saw blade and the fence is crucial because any misalignment will cause the cut to veer off course.
2. Rails Bowed or Misaligned
The rails may be bent or misaligned, causing the saw to travel in a curved path during the cut. This issue can occur for various reasons, such as wear and tear over time or improper handling of the saw.
If the rails are bowed or misaligned, you may need to adjust or replace them to achieve accurate and straight cuts with your miter saw.
3. Slightly Warped or Damaged Blade
Another common reason for crooked cuts on your miter saw is a slightly warped or damaged blade. Over time, the saw blade can warp due to various factors such as temperature fluctuations and stress. When a blade is warped, it will result in uneven cuts.
To identify whether your saw blade is warped, shine a light on the side of the blade while spinning it by hand. If you notice inconsistencies in the shadows, then it’s likely that the blade may be warped.
4. Incorrectly Installed Blade
If the blade isn’t installed correctly, it may wobble during operation. This can be a common cause of why your miter saw cuts crooked. When the blade is not securely tightened or aligned properly, it can lead to inaccurate cuts and a frustrating experience.
Taking the time to install and align the blade properly will greatly improve the performance of your miter saw and result in straight, precise cuts.
5. Inadequate Blade Cutting Capacity
Improper blade cutting capacity can lead to inaccurate and crooked cuts. When the blade on your miter saw has inadequate cutting capacity, it cannot smoothly cut through the material you are working with. This can result in the blade binding or deflecting, causing crooked cuts.
Invest in a high-quality blade specifically designed for the type of material you will be cutting to ensure precise and consistent results.
6. Misaligned Bevel Gauge
A misaligned bevel gauge is one of the most common causes of crooked cuts on a miter saw. When the gauge is off, it can result in inaccurate angle cuts that won’t line up. Various factors, including movement or impact on the saw, can cause this.
Fortunately, realigning the bevel gauge is a simple fix. Refer to the user manual to learn how to realign the gauge and ensure it is properly calibrated before starting your next project.
7. Misaligned Miter Gauge
If you’ve already checked and realigned the bevel gauge on your miter saw but are still experiencing crooked cuts, the next thing to examine is the alignment of the miter gauge.
Like the bevel gauge, the miter gauge is crucial in achieving accurate cuts, especially when making miter cuts for frames. Even a slight misalignment can result in improper angles and crooked cuts.
Following the manufacturer’s instructions will ensure your miter gauge is properly adjusted, allowing you to make precise and straight cuts with your saw.
8. Unstable Workpiece
When the workpiece is unstable, it can easily move during cutting, leading to crooked cuts on your miter saw. Even a slight movement can throw off the accuracy of the cut, resulting in a less-than-perfect angle.
Make sure you firmly clamp the workpiece to the saw table to prevent any shifting while making bevel cuts.
9. Uneven Pressure
Applying uneven pressure on the miter saw can cause it to veer off, resulting in a crooked cut. When using a miter saw, maintain a steady and consistent pressure throughout the cutting process.
Uneven pressure can lead to the blade deviating from its intended path, resulting in a cut that is not straight. So, keep a firm grip on the material and guide it smoothly through the blade.
How to Adjust a Miter Saw and Calibrate for Accurate Cuts?
Follow these key steps to adjust and calibrate a miter saw for accurate cuts
STEP 1. Determine the Reason
There could be several reasons your miter saw is cutting crooked or inaccurately. The most common cause is improperly clamping down the material you’re cutting.
Other potential reasons include a damaged blade, an unstable fence, a broken bevel gauge, or a malfunctioning miter gauge. Identifying the problem will help you address it effectively.
STEP 2. Check the Blade Alignment
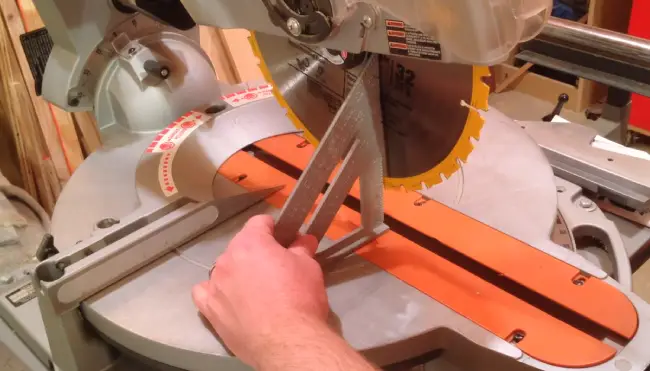
Checking the blade alignment is crucial in ensuring accurate and straight cuts on your miter saw. Grab your trusty speed square, a triangular marking tool, to begin this process.
Take a moment to observe if there is a gap between the blade and the speed square. If you notice any disparity, it means that the blade requires adjustment.
A misaligned blade can result in crooked cuts, throwing off your entire project. By checking and correcting the blade alignment, you can ensure the precision and quality of your cuts, avoiding any frustrating mistakes.
STEP 3. Adjust the Blade
Now that you have checked the blade alignment let’s adjust the blade. This is crucial in ensuring that your miter saw cuts straight and accurately.
Locate the bevel handle at the back of the saw to adjust the blade. Loosen the handle just enough to move the blade. Now, take your speed square and hold it upright on the table. Slowly move the blade until it impacts the speed square completely.
Once you have achieved this, tighten the bevel handle to secure the adjustment. It’s important to ensure that the blade is firmly fixed and not loose.
STEP 4. Set the Proper Cutting Depth
After adjusting the blade, unplug the saw and loosen the hex nut on the upper saw arm to set the cutting depth. Once the hex nut is loose, turn the depth adjustment screw with a hex key wrench.
Turning it clockwise will raise the blade while turning it counterclockwise will lower it. Check the depth by lowering the blade to the table and making necessary adjustments. This will help you achieve the desired cutting depth for your project.
STEP 5. Adjust the Fence
Once you’ve set the proper cutting depth, it’s time to adjust the fence on your miter saw. The fence plays a crucial role in ensuring an accurate and straight cut.
To begin, loosen the bolts on the fence’s left side. A speed square should be placed flat against the fence after lowering the saw blade. This will act as a guide to help you align the fence with the saw blade.
You need to adjust the fence so that it is completely in contact with the saw blade’s side. Once you have achieved proper alignment, tighten the bolts securely.
To double-check your work, use a level to align both fences. This adjustment will significantly improve the accuracy and precision of your cuts, ensuring a clean and straight result.
STEP 6. Calibrating the Saw
Lastly, you have to calibrate the miter saw. Make sure the saw blade is at a 90-degree angle to the table using a speed square. Place the speed square against the blade and check for any gaps. If there are gaps, you can adjust using the bevel adjustment bolt near the back of the saw.
Tilt the saw to a 45-degree angle and check again for any gaps. If major gaps persist, it may be necessary to seek professional assistance.
Calibrating your miter saw is essential for precise and clean cuts. Following these steps ensures your saw is properly calibrated and ready to deliver accurate results.
Why is my miter saw cutting at an angle?
An unstable fence could be one possible reason your miter saw is cutting at an angle. When the fence is not securely in place, it can cause the material to shift during the cutting process, resulting in crooked cuts.
To ensure a stable fence, ensure it is properly tightened and aligned with the blade. Also, check for any signs of damage or wear on the fence, which can contribute to instability.
Another factor to consider is the clamping of the material. If it is not securely held, it may move during the cut, leading to angled cuts. Use proper clamping techniques to prevent this and ensure the material is firmly secured before cutting.
What cut should you never do on a miter saw?
You should never attempt to cut solid timber along the grain with a miter saw. Cutting along the grain can cause the wood to splinter and tear, resulting in an uneven and crooked cut.
Miter saws are designed to make clean and precise cuts across the grain of the wood, allowing for accurate angles and smooth edges.
However, the blade can catch and pull the wood when cutting along the grain, leading to a jagged and uneven cut. To avoid this, properly position the wood and ensure the blade cuts across the wood grain.
Achieve Precise Cuts Every Time With a Calibrated Miter Saw
When your miter saw cuts crooked, it can be frustrating. However, you can always ensure accurate cuts with the right adjustments and calibration. Remember to check for uneven pressure and make necessary adjustments to achieve the desired results.
A well-calibrated miter saw is like a reliable brush in the hands of a master carpenter, allowing them to create precise and beautiful cuts.
So, take the time to calibrate your miter saw properly, and watch your woodworking projects come to life with precision and finesse.