How To Measure Table Saw Blade Height: 4 Methods [ Easy DIY]
Whether you are a professional carpenter or a DIY enthusiast, a table saw is a must-have tool in your woodworking arsenal. It is a versatile machine that can precisely cut a wide range of materials. However, adjusting the blade height is critical to ensure safety and accuracy when using a table saw.
There needs to be a perfect balance between the blade’s height and depth to prevent kickback or blade damage. Various ways to measure a table saw blade height include setup blocks, TDC adjustment, or test cuts and measurements.
As such, precise mastery of blade height measurement stands tantamount. Subsequently, we will discuss the methods necessary to measure blade height with surgical precision and the impact of such measurements on cutting quality.
How To Measure Table Saw Blade Height: Methods to Follow
One of the essential steps in setting up a table saw is aligning the insert and adjusting the blade height for accurate measurements. There are several methods to measure the table saw blade height.
- Method 1: Setup Blocks
- Method 2: Larger Device for Easier Measurement
- Method 3: Top Dead Center (TDC) Adjustment
- Method 4: Test Cuts and Measurements
Method 1: Setup Blocks
Using setup blocks is a precise and straightforward method of measuring the blade height. These blocks are available in various thicknesses and are made to exact dimensions, making them a reliable choice.
Place one setup block on the table surface next to the blade to use this method. Adjust the blade height until it touches the block. This provides a baseline measurement for the blade height and can be used to make further adjustments.
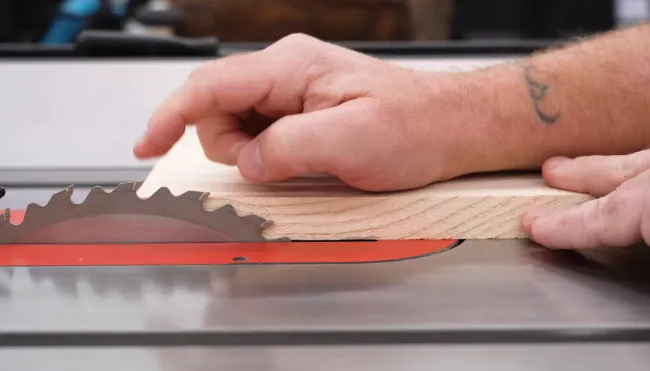
Method 2: Larger Device for Easier Measurement
Using a larger device like a straight-edge tool makes measuring the blade height easier, especially when the blade is located in a hard-to-reach area. To use this method, place the flat surface of the device over the blade, ensuring it is parallel to the table surface.
Measure the distance between the flat and table surfaces using a measuring tool. This measurement indicates blade height, so you can adjust it as needed.
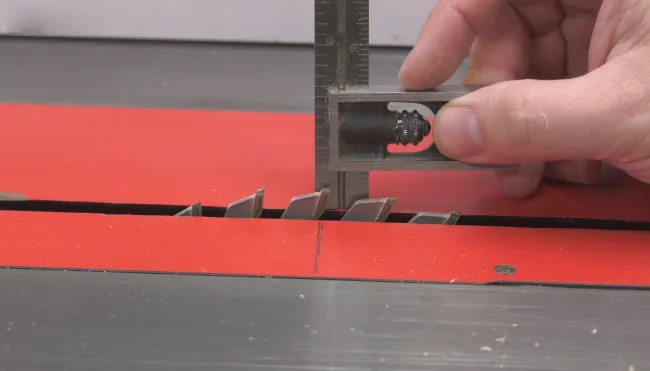
Method 3: Top Dead Center (TDC) Adjustment
Using the Top Dead Center (TDC) adjustment method increases the accuracy of aligning the blade. To use this method, use a combination square to find the TDC point of the blade. Place the square against the side of the blade and rotate it until the square no longer touches the blade teeth.
Lock the square in this position and adjust the blade height until the square’s edge touches the top of the blade, indicating that it is at TDC. This ensures that the blade is at the optimal height for a precise cut.
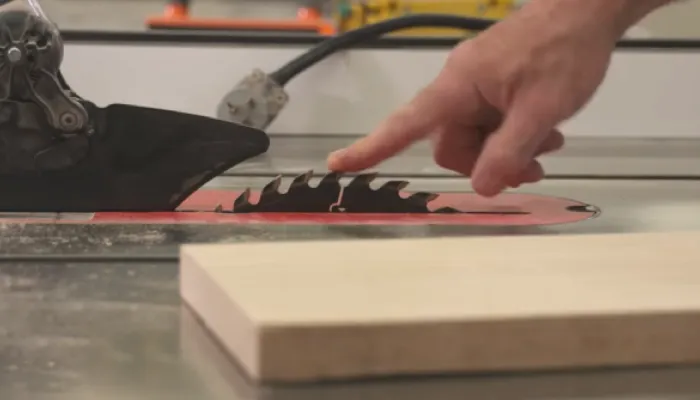
Method 4: Test Cuts and Measurements
Making test cuts on scrap pieces of wood is an effective way to fine-tune the blade height to produce the desired cut. Measure the depth of the cut and compare it to the desired height. If the cut is too shallow, increase the blade height slightly; if it’s too deep, decrease the height.
Continue making test cuts and measurements until the desired blade height is achieved. This method is useful when precise adjustments are required for specific cuts.
How to Adjust the Table Saw Blade Height?
There are several steps to follow to adjust the height of a table saw blade.
One: Prepare and Find Out the Blade Mechanism
To prepare for measuring the height of the blade, it is important to locate the height adjustment mechanism on the saw. This mechanism can be a handwheel, a crank, or a lever, depending on the specific model of the saw.
Once the mechanism is located, it is important to ensure that it is in good working condition and that it is properly lubricated. This will help ensure the blade can be raised and lowered smoothly and accurately.
Upon preparing the mechanism, it must be determined how it raises or lowers the blade. Consulting the owner’s manual for the saw can often accomplish this. Some saws may require the use of a special tool for height adjustment.
In this case, it is important to ensure that the tool is available and in good condition before attempting to adjust the height of the blade.
Two: Set an Initial Blade Height
To minimize the chances of kickbacks and ensure safety, it is advisable to start with a conservative blade height of approximately 1/8 inch above the material you will be cutting. This height is appropriate for beginners and can be adjusted as per the need, considering the thickness of the material being cut.
Begin by loosening the blade height adjustment knob/lever and lowering the blade slowly until it is just over the surface of the material you will be cutting. Verify the blade height with a ruler/gauge, lock it in place, and test the cut to ensure that the blade is cutting precisely.
NOTE: You can adjust the blade height further depending on the material and cutting task.
Three: Align a Material and Adjust the Blade Height
Proper positioning and securing of the material on the table saw are crucial in ensuring that the cut is accurate and safe. To achieve this, it is important to use clamps or other appropriate methods to prevent movement during cutting.
Additionally, it is important to observe the blade and the top surface of the material closely. Once the material is properly secured and positioned, check the blade height. To do this, slowly raise the blade until it is just above the material’s surface.
Use a ruler or other measuring tool to ensure the blade is at the desired height.
This process should be repeated for each cut, as the height may need to be adjusted for different materials or types of cuts.
Why Is Adjusting the Table Saw Blade Height Important?
Adjusting the table saw blade height is crucial for several reasons.
## Safety
To ensure safety when using a saw, pay close attention to the blade’s positioning and take action to prevent kickback incidents. The most effective way to do this is by setting the blade height appropriately. You can minimize the chances of kickback, which can cause serious injuries, by correctly setting the blade height.
Following the manufacturer’s instructions is important. As a general rule, set the blade height just above the thickness of the material you are cutting. This helps prevent spitting of the material and ensures you make a clean, precise cut.
Besides wearing goggles and earplugs, you should secure your workpiece correctly before cutting to keep yourself safe.
## Clean and Accurate Cuts
Having covered the importance of safety when using a table saw, focusing on the cuts’ quality is now essential. A critical factor affecting the cut quality is the blade’s height. Ensuring the blade is set at the proper height allows for clean and accurate cuts.
Improper blade height can cause a range of problems, including rough finishes, tear-outs, splintering, and excessive heat buildup. Therefore, to achieve clean and accurate cuts, it is necessary to measure the blade height correctly.
## Performance and Control
To achieve the best performance and control when using a table saw, it’s crucial to understand how the blade height relates to the material being cut. Different materials require varying blade heights for optimal cutting.
The blade height lets you match the cutting action to the material, which results in better control and performance.
Thicker materials require a higher blade height to obtain clean cuts, while thinner materials call for a lower height to prevent damage. By making the necessary adjustments, you can ensure precision and accuracy, especially when working with delicate materials that require a steady hand.
## Blade Longevity
Ensuring proper blade height is crucial for both performance and longevity. Incorrect settings can lead to premature dulling or motor strain, reducing the lifespan of your saw blade. Accurate measurement and adjustment are necessary for optimal outcomes and for avoiding wear and tear.
Proper blade height also results in smoother operation, preventing overheating or other damage to the blade or motor. Maintaining the correct height enhances the structural integrity of the saw, ultimately leading to better cut accuracy and precision.
Taking the time to measure and adjust accurately maximizes your saw’s lifespan and performance.
Does table saw blade heights affect cutting performance?
Table saw blade height can impact cutting performance. If the blade is not set properly, it can cause excessive heat and wear. This leads to a lower-quality surface that requires more sanding or planing. When the blade height is too low, the teeth cannot cut through the material effectively.
As a result, the blade can bind, kickback, or burn the wood. If the blade height is too high, the teeth cannot engage the material correctly, resulting in a rough and jagged cut and excessive vibration. Setting the blade height at the appropriate level for the material being cut is vital to achieve optimal cutting performance.
To get a clean, efficient cut with low heat buildup and minimal blade wear, the blade should extend slightly above the surface of the cut material. Regularly checking and adjusting the blade height ensures consistent cutting performance over time.
What’s the best height for table saw blades?
When setting the level of your table saw blade, it’s important to choose the right height for optimal performance and to minimize damage to the blade. As discussed earlier, the general rule is to keep it 1/8” above your workpiece, which is considered the safest height to avoid injuries.
You’re less likely to sustain serious harm if you accidentally touch the blade at this height. However, remember that the best height depends on the cut you want. Increasing the blade height slightly may be necessary to achieve a clean cut if you’re cutting thick hardwood.
Conversely, if you’re cross-cutting, you may have to lower the blade height to prevent splintering. Each cut requires a specific blade height adjustment to achieve the desired results. Finding the best level for your blade may take some experimentation, but it’s worth doing it right.
What happens if the table saw blade is too high?

When the blade of a table saw is too high, dangerous accidents can occur. It can cause severe injuries that may leave permanent damage and financial burden on the affected person and their close ones.
It also results in increased tear-out and chipping of the material as the kerf cuts through the unsupported fibers on the surface. This can lead to splintering and breaking apart of the material.
The material between the blade and the fence can bind, and the blade can catch on knots in the wood, throwing it back at the operator with high velocity. It can cause life-threatening injuries or may lead to unfortunate deaths.
Following the manufacturer’s instructions and adhering to the safety guidelines will help you avoid these mishaps.
What’s the most common table saw blade size?
Table saws and compound miter saws typically use carbide-tipped blades. The most common blade size is 10 inches, which can be cut through various materials like wood, metal, and plastic. Woodworkers prefer the 10-inch blade since it can handle thicker pieces of wood and make deeper cuts.
The blade has a range of teeth from 24 to 80 to accommodate different cuts. It’s important to note that the blade size should match the saw’s arbor size to avoid accidents and saw damage. Always measure the blade height before cutting to ensure it’s correct for the material being cut.
Is it possible to use a 7-inch blade on a 10-inch table saw?
On a 10-inch table saw, using a 7-inch blade is possible but not recommended unless a shallower cut is required. It can cause tearing out and burning issues due to a reduced rim speed. This can be especially problematic when cutting across the grain of the wood.
The depth of cut will also be significantly reduced, limiting the saw’s ability to cut through thicker material. Using an appropriately sized blade for optimal performance and reducing potential problems is better. If a smaller blade is necessary, it is important to adjust cutting techniques to minimize the risks of tear out and burning.
Adjust Table Saw Blade Height for Accurate and Safe Cuts
Measuring and adjusting the blade’s height correctly is crucial when working with a table saw to get accurate and safe cuts. The ideal blade height varies depending on the material and blade type used. Reviewing the manufacturer’s instructions for specific recommendations is always essential when setting up the saw for use.
While 10 inches is the most common blade size, smaller blades can be used as long as they are compatible with the saw’s arbor size. Nevertheless, you should follow the manufacturer’s instructions regarding blade size and compatibility to ensure optimal performance. So, any sawing job can be made safer and more accurate by carefully measuring and adjusting the blade height.