Best Way to Cut Acrylic Sheet: Tools & Methods Explained
You’ll want to choose your cutting method based on acrylic thickness and cut complexity.
For thin sheets (2–3 mm), score and snap using a sharp utility knife with multiple light passes.
Thicker sheets need fine-tooth, carbide-tipped blades on a table saw or router for clean cuts and less chipping.
Support the sheet firmly, keep blades sharp, and use steady pressure to avoid cracks.
Proper setup and safety gear are essential, and exploring these steps further will improve your results.
Key Takeaways
- Use score-and-snap method with a sharp utility knife for acrylic sheets about 2–3 mm thick for clean, precise breaks.
- For thicker acrylic (>6 mm), cut with a fine-tooth, carbide-tipped blade on a table saw or router for smooth edges and minimal chipping.
- Securely support the acrylic sheet along the entire cut line to prevent vibration, cracking, and ensure straight cuts.
- Maintain a steady feed rate and keep blades sharp to avoid melting, chipping, and achieve clean, smooth edges.
- Apply masking tape on cut lines for visibility and protection, and use guides to ensure accurate, straight cuts.
Choosing the Best Cutting Method for Acrylic Sheets

Selecting the right cutting method for acrylic sheets hinges on the material’s thickness and the complexity of the cuts you need.
Choosing the proper acrylic cutting method depends on thickness and cut complexity for the best results.
For thin sheets around 2–3 mm, straight cuts are best handled using the score-and-snap technique with a sharp utility knife or acrylic cutter.
You’ll want to score the sheet repeatedly to about halfway through before snapping it cleanly over a table edge.
When working with thicker acrylic, over 1/4 inch or 6 mm, using a table saw or router fitted with fine-tooth, carbide-tipped blades guarantees smoother edges and reduces chipping.
For complex shapes or when repeatability and precision matter, CNC routing or laser cutting is your best choice.
These methods deliver consistent, detailed profiles with minimal edge damage.
Choose tools based on your sheet’s properties and cut requirements for optimum results.
Always wear eye protection to shield yourself from potential shards and ensure safe handling during cutting.
Marking and Measuring for Precise Acrylic Cutting
To kick things off, it’s a good idea to apply masking tape along your intended cut path. This not only enhances visibility but also protects the surface of your acrylic.
Next, grab a machinist’s square or a straightedge and measure carefully from a factory edge. This step is crucial for ensuring accuracy.
Once you’ve got your measurements down, go ahead and mark your cut line on the tape using a fine-tip permanent marker. Just be sure to align it so that the blade or scoring groove can remove the marked line without making your piece undersized.
It’s all about precision! Using a precision track saw square can greatly improve the accuracy and repeatability of your cuts.
Accurate Line Marking
A straightedge and a fine-tip permanent marker are essential tools for accurate line marking on acrylic sheets.
Begin by applying masking tape along the intended cut line to enhance visibility and protect the surface from scratches.
Measure carefully from a factory edge, which offers greater reliability than a previously cut edge.
Use a machinist’s square or a metal straightedge to guide your markings, guaranteeing the line remains perfectly straight and square.
Mark the cutting line on the tape, not directly on the acrylic, to avoid permanent errors.
Align your straightedge so that the blade or scoring tool will remove the marked line without undersizing the piece.
This precise preparation minimizes errors and guarantees cleaner cuts.
This is especially critical when working with costly or thick acrylic sheets.
Ensure your work surface is flat and stable, and consider securely clamping the sheet to prevent movement during cutting for greater accuracy and safety.
Reliable Measurement Techniques
When measuring acrylic sheets for cutting, accuracy depends heavily on using consistent reference points and reliable tools. Always measure from a factory edge whenever possible, as it offers a true baseline compared to previously cut edges.
Use a machinist’s square or a precision straightedge to maintain right angles and straight lines. Apply masking tape along the intended cut path to enhance line visibility and protect the surface.
Mark the measurement line with a fine-tip permanent marker or grease pencil on the tape to avoid ink bleeding. Double-check all dimensions before cutting, and align your guides so the blade or scoring tool removes the marked line without undersizing the piece.
Precise measurement guarantees clean edges and reduces material waste during acrylic cutting. For enhanced accuracy in transferring angles, consider using a precision angle finder designed for woodworking and related materials.
How to Score and Snap Thin Acrylic Sheets
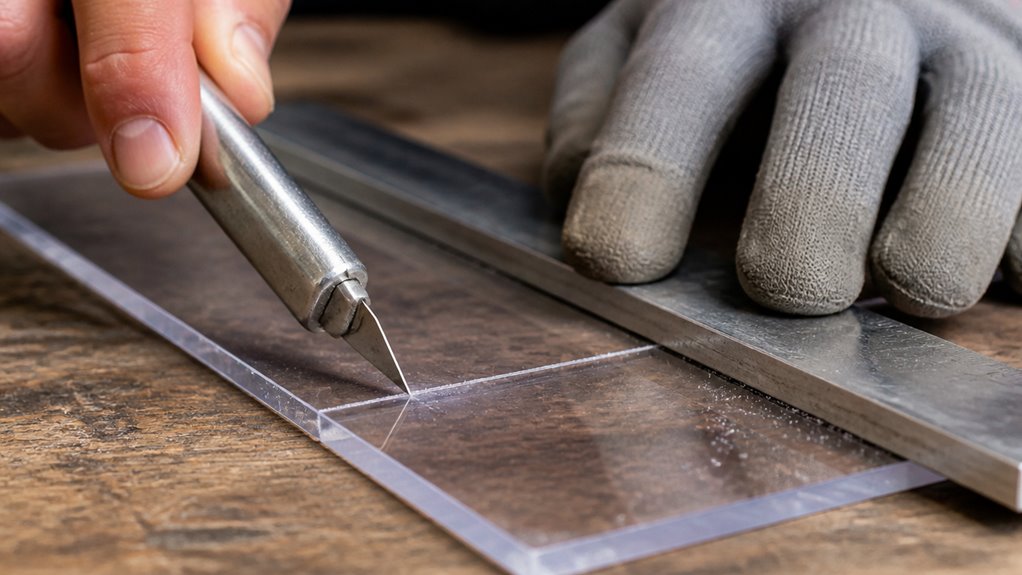
To score and snap thin acrylic sheets effectively, it all begins with the right tools. Grab a sharp acrylic scoring blade or a utility knife—these are designed to create clean grooves. You’ll want to make multiple light passes over the same line. This way, you can deepen the score without risking cracks in the sheet.
Once you’ve got a good score line, it’s time to snap! Support that scored line on the edge of a table. Apply some controlled pressure, and you should get a nice, clean break. Easy peasy!
To ensure safety during cutting, always wear protective clothing and goggles to prevent injury from sharp edges or debris.
Choosing The Right Blade
Select a blade designed specifically for scoring acrylic to guarantee clean, controlled grooves that facilitate snapping. For thin sheets, use an acrylic scoring blade or a sharp utility knife with a replaceable blade.
Avoid dull or general-purpose blades, as they cause rough cuts and increase cracking risk. Make multiple light passes to deepen the groove without damaging the sheet.
| Blade Type | Best Use |
|---|---|
| Acrylic Scoring Blade | Thin acrylic (2–3 mm) |
| Sharp Utility Knife | Thin sheets, straight cuts |
| Dull Blade | Avoid – causes chipping |
| Carbide-Tipped Blade | Thick sheets, saw cuts |
| Specialty Scoring Blade | Precision grooves |
Choose blades that maintain sharpness and fit your tool for consistent results and safer operation. For thicker acrylic sheets, consider using a thin kerf carbide blade to reduce heat buildup and deliver cleaner cuts with less material waste.
Scoring Technique Tips
Although scoring thin acrylic sheets may seem straightforward, mastering the technique requires consistent pressure and multiple light passes to create a clean groove without damaging the material.
Begin by aligning a straightedge along your marked cut line to guarantee accuracy. Use a sharp acrylic scoring blade or utility knife, making a light initial pass to establish the groove.
Gradually increase pressure with each subsequent pass, but avoid forcing the blade to prevent cracking. Score to about one-third to halfway through the sheet’s thickness for ideal snapping readiness.
Keep the blade angle steady and the scoring line continuous to prevent jagged edges. Repeated, controlled scoring guarantees a crisp groove, minimizing chipping and facilitating a clean break when snapping.
Always maintain firm support under the sheet during scoring to reduce vibration. Using tools with precise depth control can help improve accuracy and prevent over-scoring or damaging the acrylic.
Proper Snapping Method
When you’ve scored the acrylic sheet deeply enough, you’re ready to snap it cleanly along the groove.
Position the sheet with the scored line aligned precisely at the edge of a sturdy table or workbench.
Support the scored side facing upward to guarantee the break follows the groove.
Hold the sheet firmly on both sides of the score, applying steady, even pressure downward on the unsupported side.
Avoid sudden force, which can cause uneven breaks or cracks.
A clean snap occurs when the acrylic fractures along the score line, separating the pieces neatly.
If the break isn’t clean, re-score the groove to deepen the line before snapping again.
Proper support and controlled snapping prevent chipping and guarantee a smooth, straight edge on your thin acrylic sheet.
Using blades with an aggressive pitch helps achieve faster, cleaner cuts when scoring acrylic sheets.
Setting Up Your Saw or Router for Acrylic Cutting
Prepare your saw or router carefully to guarantee clean, precise cuts on acrylic sheets. Choose a fine-tooth, carbide-tipped blade with closely spaced teeth for your circular saw to minimize chipping.
Securely support the acrylic sheet along the entire cut line to prevent vibration and cracking.
When using a router, fit a sharp, spiral up-cut bit designed for plastics, ensuring smooth chip removal.
Align your guide or fence accurately to maintain straight cuts. Measure from a factory edge whenever possible for reliability. Feed the acrylic steadily; don’t force the tool to avoid melting or edge damage.
Mask the cut line with tape to protect the surface and improve visibility. Test your setup on scrap material to confirm blade sharpness, feed rate, and edge finish before working on your final piece.
Using a blade with a high tooth count such as 80 teeth, like those designed for ultra-fine finish, helps produce smoother cuts and minimizes tearout on acrylic.
Essential Safety Tips to Prevent Cracks and Injuries
After setting up your saw or router with the right blade and securing the acrylic sheet properly, focus on safety measures to protect yourself and maintain material integrity.
Always wear safety goggles to shield your eyes from flying shards and chips. Use cut-resistant gloves to prevent hand injuries and a dust mask to avoid inhaling fine acrylic particles.
Wear safety goggles, cut-resistant gloves, and a dust mask to protect against shards, cuts, and inhaling particles.
Keep your blades sharp; dull blades increase slipping and cause ragged cuts or cracks.
Fully support the acrylic sheet to minimize flexing and vibration, which can lead to chipping or cracking.
Feed the blade steadily without forcing the cut, as excess pressure can cause melting or breakage.
Following these precautions helps you achieve clean cuts while reducing the risk of injury and damage to the acrylic.
Regularly inspect blade sharpness to maintain cutting efficiency and prevent damage to both the material and tool.
Finishing Acrylic Edges for a Smooth, Professional Look
Achieving smooth, professional edges on acrylic requires careful finishing beyond the initial cut.
After cutting, start by sanding the edges with progressively finer grits, beginning around 120 grit and moving up to 600 grit or higher. This removes saw marks and chips.
Use a sanding block to maintain flatness and avoid uneven surfaces.
For thicker sheets, consider flame polishing with a propane torch, moving the flame evenly along the edge to melt and smooth the surface without overheating.
Alternatively, buffing with a rotary tool fitted with a polishing wheel and acrylic-specific compound can restore clarity and shine. Always test finishing methods on scrap acrylic to prevent damage.
Proper finishing not only improves appearance but also strengthens edges, reducing the risk of cracking or chipping during use.
Frequently Asked Questions
Can Acrylic Sheets Be Cut With a Regular Household Knife?
You can cut thin acrylic sheets, about 2–3 mm thick, with a regular household knife by scoring repeatedly along a straightedge and snapping the sheet.
However, the knife must be very sharp, and you need to make multiple passes to avoid cracking.
For thicker sheets, this method won’t work well and risks damaging the material.
Always support the sheet fully and wear safety gear to protect against shards when snapping.
How Do Temperature Changes Affect Acrylic Cutting Results?
Cold acrylic becomes more brittle, increasing the risk of cracks or chips during cutting.
Warm acrylic softens, which can cause melting or rough edges if you cut too fast.
Remember, “measure twice, cut once.” Always test your cutting method at the working temperature.
Maintain a stable, moderate temperature to guarantee clean cuts and reduce stress.
Adjust blade speed and pressure accordingly to avoid damage caused by temperature fluctuations.
What Is the Best Way to Clean Acrylic Sheets After Cutting?
To clean acrylic sheets after cutting, use a soft, lint-free cloth with mild soap and warm water. Avoid ammonia-based cleaners that can cause clouding or damage.
Gently wipe the surface in circular motions to remove dust, chips, and adhesive residue. Rinse thoroughly with clean water and dry with a microfiber cloth to prevent scratches.
Never use abrasive pads or harsh chemicals, as they’ll dull or scratch the acrylic’s surface.
Can Acrylic Dust Be Recycled or Safely Disposed Of?
You can’t recycle acrylic dust through conventional means because it’s a fine particulate that contaminates recycling streams.
Instead, collect it carefully using a vacuum with a HEPA filter or a dust collection system to avoid inhalation risks.
For disposal, treat the dust as non-hazardous industrial waste and follow local regulations.
Usually, you’ll place it in sealed containers for landfill disposal.
Avoid washing it down drains to prevent environmental contamination.
How Long Do Acrylic Cutting Tools Typically Last Before Replacement?
Acrylic cutting tools typically last anywhere from a few hours to several days of continuous use, depending on the tool type, blade quality, and cutting conditions.
You’ll need to replace or sharpen blades once you notice increased resistance, chipping, or rough edges.
Keeping blades sharp and using proper feed rates extends tool life.
Routinely inspect your tools for wear to maintain clean, precise cuts and avoid acrylic cracking or melting during cutting.
Cutting Acrylic Sheets: A Guide to Clean, Precise Cuts
When cutting acrylic sheets, precision is key. Did you know that improper cutting causes up to 40% of material waste in DIY projects?
By choosing the right method, marking accurately, and setting up your tools properly, you’ll minimize cracks and achieve clean cuts.
Always prioritize safety and finish edges professionally to guarantee durability and aesthetics. Following these steps not only saves material but also enhances the quality of your acrylic projects.