How to Cut Dados? Essential Steps for Smooth, Tight Joints
To cut dados, start by accurately marking your layout with a sharp knife and gauge. Assemble your dado blade stack carefully, ensuring outer blades face out and chipper blades alternate to avoid tooth contact.
Adjust blade height to half the wood thickness and set your fence precisely for consistent cuts. Make multiple passes with push sticks for safety and control.
For hand-cut dados, use chisels to pare waste from both sides carefully. Follow these steps, and you’ll master clean, precise dado joints. There’s more detailed guidance to help perfect your technique.
Key Takeaways
- Mark dado layout precisely using a cutting gauge or square and score lines with a sharp knife for clean edges.
- Assemble dado blade stack with outer blades facing outward, alternate chippers, and add shims to match desired dado width.
- Set blade height to desired depth, usually up to half the workpiece thickness, and position fence or miter gauge accurately.
- Make multiple shallow passes with push sticks or feather boards for safety and cleaner cuts, avoiding tear-out or chip buildup.
- For hand-cut dados, pare waste with chisels bevel up and down, checking depth consistently and finishing with a router plane.
Table Saw Techniques for Cutting Dados
When cutting dados with a table saw, you’ll need to carefully adjust the blade height to match the desired depth, usually up to half the thickness of your material. Selecting the appropriate blade material can improve the quality and longevity of your cuts.
Next, set your rip fence to position the dado accurately on the workpiece. For consistent results, use the fence when cutting cross-length dados and consider a miter gauge with a sacrificial fence to prevent splintering and support the wood.
Set the rip fence precisely and use a miter gauge with a sacrificial fence to prevent splintering.
Use push sticks or pads to keep your hands safe and maintain steady feed. For wider dados, make multiple passes, shifting the fence or blade incrementally to remove waste evenly.
Feather boards can help apply downward pressure, ensuring cleaner cuts. Always check that your blade height and fence settings are precise before starting to maintain safety and accuracy. Remember to use push sticks or push shoes and keep your fingers safely away from the blade to prevent accidents.
Setting Up a Stacked Dado Blade
Alright, let’s get started with setting up your stacked dado blade. First things first, make sure you assemble the dado stack correctly. You want those outer blades facing outward, and don’t forget to alternate the chippers so that none of the teeth are touching. It’s all about getting that setup just right. Proper assembly ensures safe operation and accurate cuts. Also, ensure your blade has the correct tooth type for the material to prevent buildup and maintain clean cuts.
Now, once you’ve got that done, it’s time to measure. Take the combined thickness of your blades and compare it with the thickness of the wood you’re working with. If you need to, add or remove some chippers and shims until everything matches up perfectly. This little bit of adjustment is crucial, as it’ll help you achieve a clean and snug dado cut. Plus, it’ll keep your blades and workpiece safe from any damage.
Assembling Dado Components
Although assembling a stacked dado blade requires careful attention, following a systematic approach guarantees accuracy and safety.
Start by loosening the arbor nut and placing the right-side outer blade with teeth facing outward, matching the saw’s rotation. Be sure to use the appropriate side plates for right or left hand arbors to ensure proper fit and function. Using blades with precision ground teeth helps ensure cleaner and more accurate cuts.
Next, add chipper blades one at a time, ensuring their teeth alternate and don’t touch adjacent blades. Use spacers for fine thickness adjustments.
Place the left-side outer blade last, also facing outward.
Lay the stack flat on a surface to confirm all components sit evenly.
Avoid tooth-to-tooth contact to prevent damage and vibration.
Tighten the arbor nut securely using a wooden wedge between blades, avoiding the arbor stop to prevent misalignment.
This precise assembly sets you up for clean, consistent dado cuts.
Adjusting Blade Width
Because achieving the correct dado width is critical for a proper joint, you’ll need to carefully build your stacked dado blade to match your material.
Start by laying a wood piece equal to the desired fit on a flat surface. Use one outer blade as a reference, then stack chipper blades with alternating teeth, avoiding contact. Using blades with the appropriate tooth design helps ensure clean and precise cuts.
Add spacers in 1/16″ increments or shims for fine tuning. Test cuts help confirm accuracy before working the actual pieces.
Proper installation involves laying the workpiece on a flat, true surface, stacking outer blades and chippers with teeth alternating to avoid contact, and ensuring at least 2-3 threads of the nut protrude for proper tightening, which is essential for safety and precision when cutting dados with a dado stack proper installation.
| Step | Detail |
|---|---|
| Reference Setup | Place outer blade and wood for width check |
| Chipper Arrangement | Alternate teeth; stack by width |
| Spacers | Insert between blades for micro adjustments |
| Shims | Final width refinement; distribute evenly |
Hand-Cutting Dados With Precision
Alright, let’s dive into how to hand-cut dados with some precision, shall we? First things first, you want to make sure you mark your dado layout really carefully. Grab a cutting gauge and a sharp knife to draw those lines—this way, you can ensure you have exact edges and depth. Lay out dado position from the bottom edge of the workpiece for consistency. It’s all about getting that foundation right!
Now, when you start chiseling, take your time. Seriously, don’t rush it! Use light paring cuts and keep that chisel bevel facing up and down. This will help you clean out the waste without messing up those important shoulders.
Once you’ve got the bulk of the dado done, it’s time to finish things off. You can use a router plane or do some careful scraping to level the bottom of the dado. This step is key to achieving a uniform and precise fit, so don’t skip it.
Accurate Layout Techniques
How do you make sure your dados are perfectly aligned before making any cuts?
Begin by marking the bottom edge of your workpiece, using a sharp 0.5mm pencil for crisp, unambiguous lines.
Reference off the front edge with an adjustable square to draw your layout lines accurately.
Mark Xs on the waste side to clearly identify material to remove.
Next, clamp a straightedge along your layout line with waste material inside the cut, ensuring the line stays visible along your saw’s guide.
Double-check that your straightedge is parallel to your marks before clamping fully.
For multiple dados, square shelf marks across panels for consistent spacing, and consider using a layout marks for centering on fixture guide pieces to ensure precise, symmetrical cuts.
Always measure twice, calculate spacing carefully considering material thickness, and verify alignment repeatedly before cutting to maintain precision. Using a sharp circular saw blade is essential to ensure clean, accurate cuts and to prevent tear-out when cutting dados.
Chiseling and Cleanup Tips
When chiseling dados by hand, selecting the right chisel size is essential to maintain control and protect the dado shoulders. Use a chisel narrower than the dado width, typically 1/2-in. or 5/8-in. for a 3/4-in. dado. A sharp marking knife should be used to score all layout lines before chiseling to ensure accuracy and clean edges.
Start bevel up for removing waste, then bevel down to refine corners. Work from both sides to avoid tear-out. Check depth consistently with a combination square or marking gauge. Use light paring cuts for a smooth bottom and finish with a router plane if available.
| Step | Technique |
|---|---|
| Initial cuts | Bevel up, flat chisel |
| Waste removal | Chisel from both sides |
| Depth checking | Combination square, gauge |
| Final cleanup | Router plane, bevel down |
Using a Router to Create Dados
Why choose a router to create dados? Routers offer precision, versatility, and cleaner cuts compared to other methods.
Routers deliver precise, versatile, and clean dado cuts, outperforming other woodworking methods.
You can easily adjust dado widths using various bits and jigs, making them ideal for cabinetry and fine woodworking. To get started:
Select straight or flat-bottom router bits sized to your dado width, typically matching material thickness. Using a digital angle gauge can help ensure the router base is perfectly aligned for accurate cuts.
Use a router jig or dual fences to stabilize and guide the router, ensuring straight, consistent cuts. Clamping jigs securely to the workbench provides essential stability during routing.
Make multiple shallow passes to avoid damaging the bit or material and maintain control.
Clamp workpieces securely and wear eye and hearing protection for safety.
With a router, you can cut through or stopped dados cleanly, achieving strong joints with minimal cleanup. Employing tools with high accuracy like digital angle gauges contributes to better fitting joints and smoother surfaces.
Adjusting and Measuring Dado Blade Width
Adjusting the width of your dado blade guarantees your joints fit snugly and securely.
First, measure your mating piece’s actual thickness with dial calipers, since plywood and sheet goods often differ from nominal sizes. Add about 0.010″ tolerance for a tight fit.
Assemble the dado stack on a flat surface using two outer blades, chippers, and spacers to match your target width plus tolerance. Make sure to stack outside blades flat so the blades’ teeth do not touch and the main bodies are flush against each other. Ensuring the blades are properly aligned helps prevent issues like blade misalignment during cutting.
Tighten the assembly firmly, then verify total width with calipers before mounting.
Make test cuts on scrap wood matching your material thickness.
Check the fit by inserting the mating piece, using feeler gauges to measure any gaps.
Remove or add spacers and chippers as needed, then recut and retest until the dado fits perfectly.
Ensuring Safety and Accuracy When Cutting Dados
Because dado cutting involves spinning blades and precise alignment, you must prioritize safety and accuracy to prevent injury and guarantee clean joints. Always wear eye and hearing protection, and verify all saw guards are properly installed before starting.
Prioritize safety and precision in dado cutting by wearing protection and ensuring all saw guards are in place.
Disconnect power when changing blades, and keep your body clear of the spinning blade. Use fences or sleds to guide stock securely, avoiding freehand cuts and minimizing kickback risk. The guard on the dado saw floats over the workpiece, differing from traditional guards, which enhances safety during dado operations. Selecting the correct blade size compatibility is crucial for optimal dado cutting performance.
Keep the workpiece tight against the fence and use push blocks to protect your hands. Make multiple shallow passes rather than one deep cut for cleaner results.
Inspect blades for damage before each use and stack them tightly on the arbor. Maintain focus, keep the workspace free of distractions, and never cut with loose jewelry or untied hair.
Frequently Asked Questions
What Types of Wood Are Best for Dado Joints?
You’ll want to choose hardwoods like oak, maple, or birch for dado joints because they’re dense and resist splitting. This gives you strong, durable joints.
Plywood is another excellent choice thanks to its stability and layered structure, especially for cabinets and shelves.
Softwoods like pine work for light-duty projects but watch out for tear-out.
MDF is okay for non-structural uses but can chip easily.
For high-end work, exotic woods like walnut are great but need specialized blades.
How Do I Repair a Damaged Dado Joint?
When a dado joint falters, you don’t just fix it; you restore its soul.
Start by applying epoxy adhesive deep into the joint’s crevices, focusing on the bottom surfaces for maximum strength.
Clamp firmly and keep that pressure for a full 24 hours to ensure a solid cure.
If the fit’s loose, plane the mating board slightly or insert a carefully matched scrap patch.
Sand edges smooth for a seamless, lasting repair.
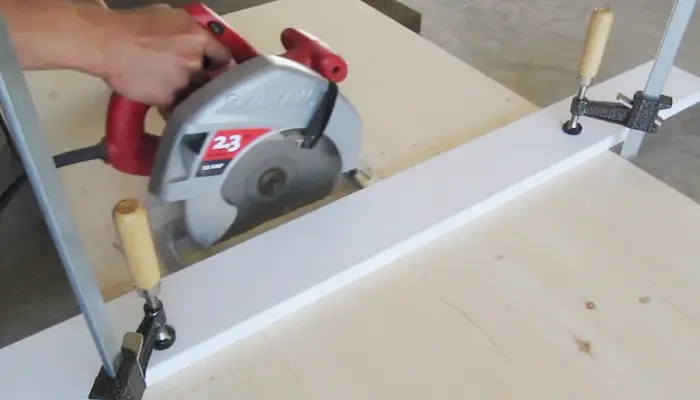
Can I Use a Circular Saw to Cut Dados?
Yes, you can use a circular saw to cut dados if you don’t have a dado blade or table saw.
Set up two guide fences clamped parallel around your marked dado area and adjust the blade depth carefully.
Make multiple passes within those boundaries, removing material incrementally.
Use a chisel to clean up ridges and smooth the dado bottom.
This method works best for shallow to medium-depth dados with precise setup.
What Glue Works Best for Securing Dado Joints?
You’ll want to use polyurethane glue for waterproof, end-grain dado joints, especially with plywood.
For indoor, long-grain dado joints without gaps, go with yellow PVA glue.
If you need waterproof flexibility outdoors, Titebond III is your best bet.
When dados aren’t perfectly tight, epoxy glues like WEST epoxy fill gaps and offer strong bonds.
Always apply glue evenly on all mating surfaces and clamp firmly for lasting joints.
How Do Humidity and Wood Movement Affect Dado Joints?
Ever wonder why your dado joints sometimes loosen or tighten unexpectedly?
Humidity causes wood to absorb or release moisture, leading to expansion or contraction, mainly across the grain. This movement can stress your joints, causing gaps or splits.
To avoid issues, you need to allow slight clearance in dados, match grain orientation, and maintain indoor humidity around 40%-60%.
Proper acclimation of wood before cutting also helps keep your joints stable and strong.
Improve Your Woodworking Workflow With Cleaner Dados
So, now you’re a dado-cutting wizard, right? Just remember: whether you’re wrestling a stacked dado blade or coaxing a router into obedience, precision and safety aren’t optional—they’re your new best friends.
Measure twice, cut once, and don’t pretend you’re invincible. If you do, you’ll end up with a project that’s more “abstract art” than furniture. Keep it sharp, steady, and safe; your dados and your fingers will thank you.