How to Cut a 4×4 With a Table Saw: 7 Steps to Follow
For many woodworking projects, there is a need to cut 4×4 lumber. However, based on my findings, cutting 4×4 lumber with a table saw differs from cutting regular lumber due to its size and stability.
You have to be precise, safe, and efficient while cutting the 4×4 with a table saw to ensure that your project turns out perfectly.
According to my research, cutting 4×4 lumber requires measuring and marking the cutting line on all four sides of the lumber to obtain the perfect cut. Then, you need to set the blade height to the maximum and adjust the rip fence to the desired width for consistency.
I will elaborate on all the necessary steps in detail so you can confidently cut 4×4 lumber with a table saw.
How to Cut a 4×4 With a Table Saw: Step-By-Step Procedure

Below I have outlined the seven steps that will enable you to cut 4×4 lumber with a table saw efficiently and safely:
- Step 1: Measure and mark the cutting line on the 4×4 lumber
- Step 2: Set the blade height to the max
- Step 3: Adjust the rip fence to the desired width
- Step 4: Start the table saw
- Step 5: Position and push the 4×4 through the saw
- Step 6: Rotate the 4×4 lumber and complete the cut
- Step 7: Turn off the saw and check the cut
Now, I will explain these steps in detail so you can understand them better and successfully cut your 4×4 lumber.
Step 1: Measure and Mark the Cutting Line on the 4×4 Lumber
To ensure accuracy and stability during the cutting process, you need to measure and mark the cutting line on the 4×4 lumber before cutting.
Ensure that the lumber is stable and will not move during marking. Use a carpenter’s square to guarantee a straight and accurate line.
You need to mark all four sides of the 4×4 where the cut will be made. This ensures clarity and consistency during the cutting process, especially if the lumber is rotated.
Use a sharp pencil or marking knife to create a visible line on each side, making sure that the lines align accurately from one side to another. Taking the time to measure and mark the cutting line will help ensure precise and successful cuts.
Step 2: Set the Blade Height to the Max
To ensure accurate and precise cuts, adjust the blade height of your table saw to its maximum setting after measuring and marking the cutting line on the 4×4 lumber.
Most table saws have a maximum blade height of around 3 inches or slightly more, but still below 4 inches. Locate the blade height adjustment wheel or lever on your table saw, usually positioned near the front of the saw. This wheel or lever allows you to raise or lower the blade.
Rotate the wheel or move the lever to raise the blade to its maximum height. By setting the blade height to the max, you ensure that the blade will cut through the 4×4 lumber cleanly and completely, resulting in accurate and precise cuts.
Step 3: Adjust the Rip Fence to the Desired Width

Now, position the rip fence, a guide parallel to the blade, to the desired width for your cut to ensure consistency and accuracy throughout the length of the 4×4.
To adjust the rip fence, locate the locking mechanism usually found at the front of the table saw near the fence. Loosen this mechanism to slide the rip fence along the guide rails.
Once loosened, position the rip fence to the desired width, ensuring it aligns perfectly with the marked cutting line on the 4×4 lumber. Use a measuring tape or ruler to confirm the accuracy of the rip fence placement.
After making adjustments, securely lock the rip fence in place to maintain consistency during the cutting process.
Step 4: Start the Table Saw
Now that everything is set up, it’s time to start the table saw. Connect the power cable to the electrical outlet. Locate the power switch on the front or side of the saw and flip it to the ‘on’ position. Allow the blade to reach its maximum speed before making the cut.
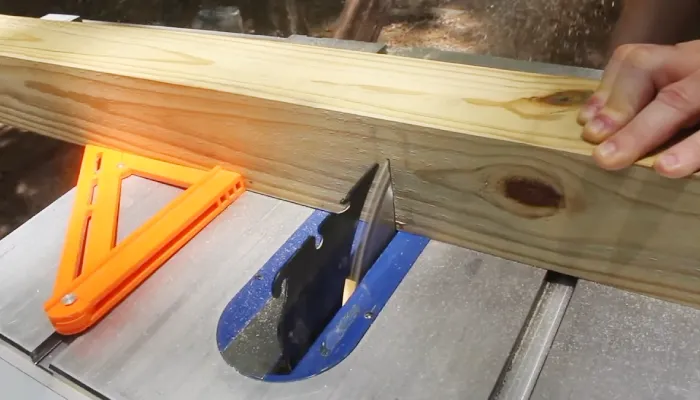
Step 5: Position and Push the 4×4 Through the Saw
Now, position one end of the 4×4 against the rip fence and align it with the marked cutting line. You need to hold the 4×4 firmly to maintain control throughout the cutting process.
With a steady hand, push the 4×4 through the blade, ensuring a smooth and controlled movement. Avoid forcing the lumber and let the saw do the cutting.
Step 6: Rotate the 4×4 Lumber and Complete the Cut
After completing the initial cut, shut off the table saw and carefully rotate the 4×4 lumber so that the uncut portion is now against the rip fence.
Make sure to align the freshly cut end with the rip fence before proceeding. Once the lumber is properly positioned, turn on the table saw and guide the 4×4 through the blade, maintaining a steady and controlled pace.
Step 7: Turn off the Saw and Check the Cut
Once you’ve completed the cut, turn off the table saw and allow the blade to come to a complete stop before inspecting your cut. Check for accuracy and smoothness. Always use caution and safety measures when working with table saws to avoid injuries.
What size blade does a table saw typically use?

Table saws typically use blades ranging from 8 to 12 inches in diameter, with the most common size being a 10-inch blade.
The choice of blade size depends on the type of cuts you need to make and the capacity of your table saw.
Smaller blades, around 8 inches, are suitable for light-duty tasks, while larger blades, such as 10 or 12 inches, are better suited for heavier and more intricate cuts.
To ensure optimal performance, consult your table saw’s manual for the recommended blade size and make sure the chosen blade is compatible with your saw’s arbor size and motor capacity.
Also, choose specialized blades for cutting materials like aluminum and wood to achieve the best results.
What is the common width of a blade used in table saws?
The common width of blades used in table saws is often expressed in kerf width. Kerf refers to the width of the material removed by the saw blade during a cut.
There are two standard sizes for carbide tips on table saw blades: 1/8 inch for a full kerf blade and 3/32 inch for a thin kerf blade. The difference lies in the width of the carbide tips.
A full kerf blade, measuring 1/8 inch wide, provides sturdy support for more robust cuts. On the other hand, a thin kerf blade, at 3/32 inch wide, is designed for tasks that require less material removal, optimizing efficiency and reducing waste.
The choice between the two depends on the specific requirements of your woodworking project.
Cut 4 X4 Lumber Confidently With Right Technique and Safety Measures
I hope you can now easily tackle the task of cutting a 4×4 with a table saw using the comprehensive step-by-step guide that I have shared. Measure the lumber meticulously, set the blade height and the fence for precision, and follow each step attentively.
Safety is paramount throughout the process. As long as you follow these guidelines, you’ll achieve accurate and efficient cuts, ensuring your woodworking projects turn out flawlessly.
Now, confidently embark on your next woodworking endeavor, capable of cutting 4×4 lumber with a table saw.