Can You Pocket Hole MDF? Tips for Strong Joints
You can pocket hole MDF effectively if you use the right screws, jig settings, and careful drilling techniques.
Always use fine-thread or MDF-specific pocket screws and clamp pieces firmly to prevent shifting and splitting.
Set your jig correctly with a sharp bit and back the edges to reduce tear-out. Avoid over-tightening clamps and screws to protect MDF’s delicate edges.
Combining glue with screws strengthens the joint as well. Keep these tips in mind for stronger, cleaner MDF pocket holes ahead.
Key Takeaways
- Pocket hole joinery is suitable for light-duty, non-structural MDF projects with careful handling to avoid splitting.
- Use fine-thread or MDF-specific pocket-hole screws sized appropriately for MDF thickness to reduce edge damage.
- Clamp MDF panels firmly and evenly with multiple clamps to prevent shifting and ensure proper screw seating.
- Support edges with scrap wood or painter’s tape during drilling to minimize tear-out and damage.
- Seal MDF edges with bonding primer or edge sealer to enhance durability and moisture resistance after assembly.
Can You Pocket Hole MDF Safely and Effectively?

You can pocket hole MDF safely and effectively if you follow specific precautions tailored to the material’s characteristics.
MDF is prone to tearing, chipping, and edge damage, so you must drill slowly with a sharp bit and use a dedicated pocket-hole jig for accuracy.
Clamping the pieces firmly before driving screws prevents shifting and reduces stress on the joint.
Avoid overdriving screws, as MDF splits or bulges under aggressive force.
Support edges with backing or painter’s tape to minimize breakout.
Position pocket holes away from weak edges and space them about every 4 to 6 inches for maximum strength.
Combining glue with screws improves joint durability.
This technique suits light-duty, non-structural MDF applications where clean, hidden fasteners are needed.
Maintaining a controlled environment with consistent humidity and temperature helps prevent material warping and prolongs joint stability.
Which Screws Work Best for Pocket Holes in MDF?
When you’re picking screws for pocket holes in MDF, it’s really important to focus on those with fine or MDF-specific threads. This helps to minimize any risk of splitting, which can be a real issue with this material.
Now, let’s talk about head design. Washer-head screws are a fantastic choice because they distribute pressure more evenly. This means there’s a lower chance of pull-through, which is something we definitely want to avoid.
For added durability and to prevent corrosion in projects that might face moisture, consider using screws with epoxy coatings designed for extended resistance.
Screw Types Recommended
Selecting the right screws markedly impacts the strength and durability of pocket-hole joints in MDF. You should opt for screws designed specifically for MDF or fine-thread pocket-hole screws as they reduce the risk of splitting the dense board edges.
Washer-head screws are preferable because they distribute pressure evenly within the pocket, minimizing pull-through. Coarse-thread screws can work but may increase the chance of damage if overdriven. Avoid aggressive driving since MDF strips out easily, especially with impact drivers.
Length matters too: use 1-1/4-inch screws for 3/4-inch MDF and shorter screws for thinner boards. Pairing these screws with glue and proper clamping guarantees the joint holds firmly without compromising the integrity of the MDF. Using a high-quality wood glue with strong bond strength can significantly enhance the durability of pocket-hole joints in MDF.
Screw Head And Thread
Choosing the right screw head and thread type is essential for securing pocket-hole joints in MDF without causing damage. You want screws that bite firmly but won’t split or tear the dense edges.
Washer-head screws are preferred because they spread the load, reducing pull-through risk in the pocket hole. Thread choice depends on MDF density: fine-thread screws minimize splitting in thinner boards, while coarse-thread screws can work for thicker MDF.
Here’s what to keep in mind:
Use washer-head screws to distribute pressure evenly in the pocket.
Select fine-thread screws for thin or delicate MDF to prevent edge damage.
Choose coarse-thread screws for thicker MDF to ensure strong grip.
This careful screw selection helps maintain joint integrity and prevents material failure.
For projects requiring precise and reliable clamping during assembly, consider using parallel clamps to maintain alignment and prevent material damage.
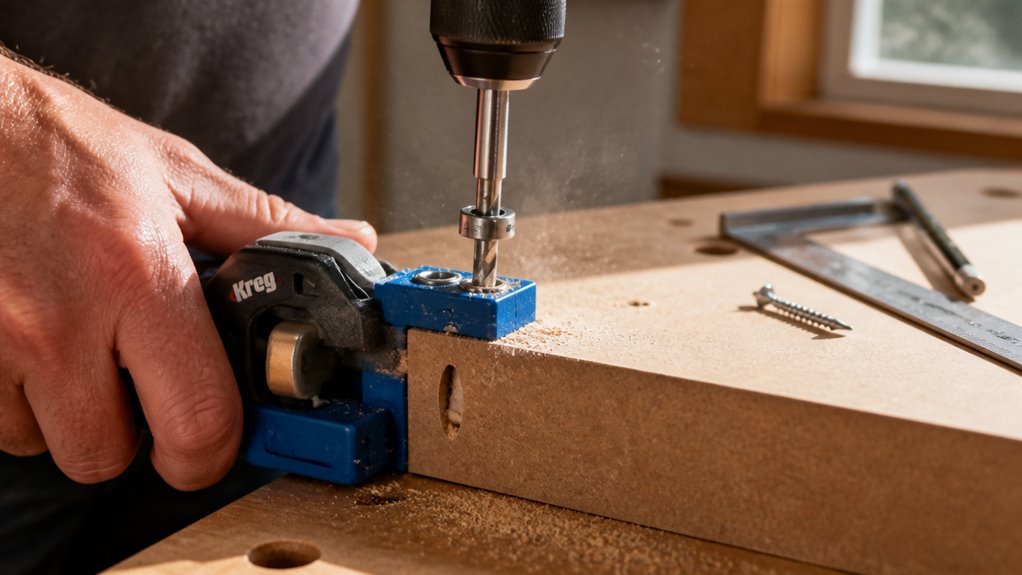
How to Set Up Your Pocket Hole Jig for MDF?
Setting up your pocket hole jig for MDF is pretty straightforward!
First, you’ll want to adjust the jig angle and depth collar to match the thickness of your board. It’s essential to get this right for clean, accurate holes.
Next up, make sure your drill bit is sharp. A sharp bit will help create those clean holes you’re aiming for and minimize any tear-out, which can be a real hassle.
Lastly, don’t forget to clamp your workpieces firmly. This will keep everything stable and prevent any shifting while you’re inserting the screws.
Trust me, taking these steps will make your project go a lot smoother!
Also, it’s a good idea to test setup on scrap wood to confirm your jig settings before working on your final MDF pieces.
Jig Angle And Depth
Set your pocket hole jig’s angle and depth carefully to guarantee clean, strong joints in MDF. Incorrect settings can cause splitting, tear-out, or poorly seated screws.
Adjust the jig so the drill bit enters MDF at the recommended angle, usually around 15 degrees, to create an ideal pocket hole shape. Next, set the depth collar on the drill bit to match your MDF thickness, ensuring the hole is deep enough for the screw without breaking through the face.
Keep these tips in mind:
- Confirm jig angle matches screw length and MDF thickness for secure engagement.
- Adjust depth collar precisely to avoid over- or under-penetration.
- Use backing support or painter’s tape to reduce edge damage during drilling.
Proper jig setup maximizes joint strength and reduces MDF damage. For best results, maintain a consistent angle during drilling to prevent weakening the joint and avoid damaging the MDF edges.
Bit Sharpness Importance
Maintain a sharp bit when preparing your pocket hole jig for MDF to guarantee clean, precise holes and prevent tear-out.
Dull bits generate excessive heat and friction, causing chipping and rough edges in the dense material. Inspect your pocket hole bit regularly; replace or sharpen it if you notice increased resistance or tear-out.
Use a sharp, dedicated pocket hole bit designed for MDF’s density to ensure consistent hole diameter and smooth screw entry.
Set the depth collar accurately to avoid over-penetration, which can damage the MDF fibers.
When drilling, operate at a steady speed with minimal pressure to further reduce splintering. Proper bit sharpness directly impacts hole quality, screw grip, and overall joint strength, so don’t overlook this vital step in your jig setup.
Additionally, maintaining optimal temperature and humidity during assembly can help ensure adhesives like PVA cure properly for a strong joint.
Clamping For Stability
You’ll almost always need a firm clamping system when working with MDF and pocket hole joinery to prevent movement and misalignment. MDF’s tendency to split or chip under pressure demands that you securely hold the workpieces before driving screws.
Setting up your pocket hole jig properly begins with stabilizing the parts to guarantee precise hole placement and consistent depth.
Key clamping tips include:
Use bar clamps or corner clamps to maintain right angles and prevent shifting.
Apply even pressure across joint surfaces to avoid bulging or gaps.
Support edges with scrap wood or backing blocks to reduce tear-out when drilling.
For enhanced stability during cutting, consider using tools with multiple adjustable clamps to secure your workpieces firmly.
How to Prevent Tear-Out When Drilling MDF Pocket Holes?
To keep MDF edges from chipping when drilling pocket holes, slow and steady drilling is essential.
Use a sharp pocket-hole jig bit and set the depth collar precisely to avoid over-penetration.
Employ a pecking drilling motion to clear dense MDF dust, reducing heat buildup and minimizing tear-out.
Backing the MDF edge with a scrap piece or applying painter’s tape over the drilling area helps support the fibers and limits edge breakout.
Avoid aggressive feed rates and excessive pressure; let the bit do the work.
If the MDF is very dense or thick, pre-drill a small pilot hole in the mating piece to reduce stress during screw insertion.
These steps guarantee clean, accurate pocket holes and protect MDF’s vulnerable edges during assembly.
For best results, applying a bonding primer to MDF surfaces before assembly can enhance durability and paint adhesion.
Where Should You Place Pocket Holes to Avoid MDF Edge Damage?
When it comes to placing pocket holes in MDF, you’ll want to space them about every 4 to 6 inches. This distance helps keep the joint strong while also protecting those fragile edges from stress.
It’s also a good idea to provide some backing or edge support. This way, you can prevent any breakout when you’re drilling and fastening.
And remember, steer clear of putting holes too close to the weaker, crumbly margins of the MDF. That’ll help you avoid any edge damage and keep your project looking sharp!
For added durability and moisture protection, be sure to seal edges before finishing your project.
Ideal Pocket Hole Spacing
Position pocket holes thoughtfully along your MDF joints to minimize edge damage and maximize joint strength.
Proper spacing is critical because MDF edges are prone to crumbling under stress.
You’ll want to avoid placing pocket holes too close to weak edges or each other to prevent splits and maintain board integrity.
Key spacing guidelines include:
Space pocket holes about 4 to 6 inches apart for balanced load distribution and reduced edge stress.
Maintain at least 3/4 inch clearance from board edges to avoid breakout during drilling and screwing.
Use consistent spacing to guarantee even clamping pressure and joint stability.
Edge Support Techniques
Protecting MDF edges during pocket hole drilling demands careful edge support techniques that minimize tear-out and crumbling.
You should always back the MDF with a firm surface, like scrap wood, to prevent breakout when the bit exits.
Applying painter’s tape over the drilling area also reduces splintering.
Position pocket holes at least 1 to 1.5 inches away from the board’s edges to avoid weak margins, as MDF edges lack tensile strength and crush easily under screw pressure.
Space pocket holes evenly, about every 4 to 6 inches, ensuring consistent load distribution without stressing the edges.
Use a pocket hole jig with precise angle and depth settings to control screw entry and avoid excessive edge damage.
Supporting the edges properly guarantees cleaner holes and stronger joints without compromising MDF integrity.
Avoiding Weak MDF Margins
Several factors influence where pocket holes should be placed to prevent damage to MDF’s fragile edges.
You want to avoid positioning pocket holes too close to the board’s edge since MDF margins can crumble under screw pressure. Instead, place them at least 1 to 1.5 inches from the edge to maintain board integrity.
Additionally, backing support behind the drilling area reduces breakout risk. Applying painter’s tape can minimize tear-out.
Keep these key points in mind:
- Maintain a safe distance from MDF edges to prevent crumbling.
- Use backing support behind the hole to reinforce the area.
- Apply painter’s tape over drilling spots to avoid surface tear-out.
What Screw Lengths Should You Use for MDF Pocket Holes?
When working with MDF pocket holes, choosing the right screw length is essential to avoid splitting or inadequate holding power.
Selecting the correct screw length for MDF pocket holes prevents splitting and ensures strong joints.
For standard 3/4-inch MDF, opt for 1-1/4-inch coarse-thread or MDF-specific pocket screws.
These lengths guarantee the screw penetrates deeply enough into the mating piece without breaking through its face.
If you’re working with thinner 1/2-inch MDF, use shorter screws around 3/4-inch to 1 inch, depending on your jig and joint configuration.
The screw should seat just below the surface to prevent over-drilling, which can strip the material.
Always select screws with washer heads to distribute pressure and reduce pull-through risk.
Avoid over-tightening; it quickly damages MDF.
Matching screw length precisely to board thickness and joint design maximizes joint integrity and minimizes material damage.
How Gluing and Clamping Strengthen MDF Pocket Hole Joints
Selecting the right screw length is only part of securing strong MDF pocket hole joints. To maximize joint strength, you need to apply both glue and clamping before driving screws.
Glue penetrates the MDF fibers, increasing the bond area and reducing the risk of joint failure under load. Clamping holds the parts tightly together, preventing gaps and shifting that weaken the connection.
Focus on these key steps:
Apply a high-quality wood glue evenly on mating surfaces for peak adhesion.
Use clamps to press the joint firmly, ensuring full contact and curing without movement.
Drive screws carefully after clamping, avoiding over-tightening which can crush MDF edges.
This combined approach greatly enhances joint durability beyond screws alone in MDF pocket hole joinery.
Which Projects Benefit Most From MDF Pocket Hole Joinery?
Pocket hole joinery works best in projects where clean, concealed fasteners and moderate strength are priorities rather than heavy structural loads.
Ideal for projects needing hidden fasteners and moderate strength, not heavy structural support.
You’ll find MDF pocket holes particularly suited for cabinet assembly, face frames, shelving, and decorative panels where edge strength demands are moderate.
Since MDF edges can crumble under stress, avoid using pocket holes in load-bearing frameworks or heavy-duty furniture.
Projects involving partitions or lightweight casework also benefit because pocket holes allow quick, precise joinery with minimal visible hardware.
To optimize performance, pair screws with glue and use proper clamping during assembly.
This technique streamlines construction when you need neat joints without extensive edge reinforcement.
Just remember, the success of these projects hinges on controlled screw insertion and appropriate screw selection designed for MDF’s unique properties.
What Common Mistakes Should You Avoid When Pocket Holing MDF?
Although pocket-hole joinery can be effective with MDF, you must avoid driving screws too aggressively. This often causes splitting, bulging, or edge damage.
To safeguard clean, strong joints, steer clear of these common mistakes:
Using standard screws instead of fine-thread or MDF-specific pocket-hole screws can over-split or strip out the material.
Drilling too quickly or without a sharp bit increases the risk of tear-out and rough holes.
Placing pocket holes too close to weak edges or without backing support can lead to crumbling or breakout during assembly.
Tips for Clamping MDF Pieces to Create Strong Pocket Hole Joints
When you clamp MDF pieces before driving screws, you prevent the boards from shifting and guarantee tighter joints.
Use clamps that apply even pressure along the joint to avoid gaps or misalignment. Position the clamps so they don’t interfere with screw placement or the pocket-hole jig.
Ensure clamps apply even pressure and are positioned clear of screws and pocket-hole jigs for precise, gap-free joints.
Apply enough force to hold the pieces firmly but avoid over-tightening, which can crush MDF edges. For larger panels, use multiple clamps spaced evenly, typically every 4 to 6 inches, to maintain consistent pressure.
Consider adding a sacrificial backing board or painter’s tape near the joint to reduce edge damage during clamping.
Finally, check alignment carefully before fastening. A properly clamped and aligned joint will allow screws to seat correctly without causing splits or bulges in the MDF.
Frequently Asked Questions
Can Pocket Holes in MDF Be Painted or Finished Without Damage?
Yes, you can paint or finish pocket holes in MDF without damage if you prepare the surface carefully.
Fill screw holes with wood filler or putty, sand smooth, and clean dust thoroughly before applying primer.
Use a high-quality primer and paint designed for MDF to seal the porous surface.
Avoid heavy sanding near edges to prevent chipping.
Proper sealing and gentle handling during finishing protect the pocket-hole area from moisture and wear.
How Does Humidity Affect Pocket Hole Joints in MDF?
Humidity causes MDF to absorb moisture, swelling the fibers and weakening pocket hole joints. You’ll notice joints loosening or the MDF bulging near screws if exposed to high humidity.
To minimize this, seal all cut edges thoroughly. Use moisture-resistant MDF when possible, and make certain joints are glued well to maintain strength.
Avoid placing MDF pocket-hole assemblies in damp environments to prevent degradation and maintain joint integrity over time.
Are There Alternative Joinery Methods Better Than Pocket Holes for MDF?
If you want stronger MDF joints, consider dowel or biscuit joinery. They distribute stress better than pocket holes.
You’ll appreciate mortise and tenon for thicker panels, offering durable connections without risking edge damage.
Cam locks and confirmat screws also work well in MDF. They provide secure fasteners with less splitting risk.
Each method demands precise alignment and proper glue use. Pick what suits your project’s load and aesthetics for the best results.
Can Pocket Holes in MDF Be Repaired if Screws Strip Out?
Yes, you can repair stripped pocket holes in MDF.
Start by filling the hole with wood filler, epoxy, or a dowel glued in place. Let it cure fully before redrilling a pilot hole and reinserting the screw carefully.
Avoid overdriving screws to prevent repeat stripping. Using a slightly larger screw or a specialized MDF screw can improve grip.
Clamping during repair helps maintain joint integrity and prevents further material damage.
What Safety Precautions Are Needed When Drilling Pocket Holes in MDF?
Worried about safety when drilling pocket holes in MDF? Always wear a dust mask and eye protection because MDF dust irritates lungs and eyes.
Use a dust collection system or work outdoors to reduce airborne particles. Clamp the workpiece securely to prevent movement, and drill slowly to avoid splintering.
Keep fingers clear of the drill bit path. Unplug tools when adjusting jigs. These precautions protect you and guarantee clean, precise holes.
Final Tips for Strong and Reliable MDF Joints
You can definitely pocket hole MDF safely and effectively if you use the right screws, set your jig precisely, and clamp firmly.
Avoid tear-out by drilling carefully and placing holes away from edges. Think of it like assembling a Victorian-era clock: precision and care make all the difference.
Follow these steps, avoid common mistakes, and your MDF joints will be strong and reliable for many projects. Don’t rush; accuracy is your best tool here.