How to Take Out Broken Screw: Easy DIY Removal Guide
To take out a broken screw, start by applying penetrating lubricant and letting it sit to loosen corrosion. Use rubber bands for grip or pliers if the screw protrudes.
Drill a centered pilot hole with left-handed bits, then insert a properly sized screw extractor. Turn it counterclockwise with steady pressure to back the screw out.
If needed, carefully modify the screw head with a rotary tool for better engagement. You’ll find detailed steps for every stage as you explore further.
Key Takeaways
- Apply penetrating lubricant around the screw head and let it soak to loosen rust and corrosion before attempting removal.
- Use locking pliers to grip and twist any exposed screw shaft counterclockwise for manual extraction.
- Drill a centered pilot hole with a slightly smaller bit than the screw diameter using a left-handed drill bit for easier loosening.
- Insert a properly sized screw extractor into the pilot hole and turn counterclockwise with steady torque to back the screw out.
- If the screw head is damaged, cut a slot with a rotary tool or use a rubber band for improved screwdriver grip before extraction.
Preparing Tools to Remove Broken Screws

Gather the right tools before attempting to remove a broken screw to guarantee efficiency and minimize damage.
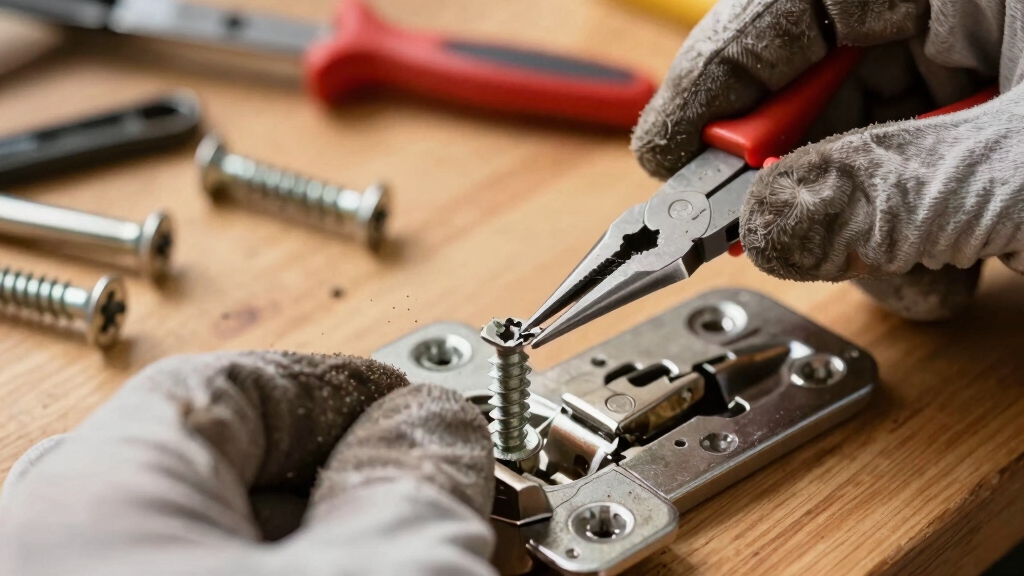
Start with needle-nose or locking pliers if part of the screw protrudes. They provide a firm grip for manual extraction.
Begin with needle-nose or locking pliers to firmly grip and manually remove any protruding screw parts.
Prepare a variable speed drill equipped with left-handed drill bits to drill into the screw counterclockwise, assisting removal.
Have a screw extractor kit, such as EZ-Out extractors, ready for insertion into pilot holes made by the drill.
Use a rotary tool with metal cutting discs to create slots or modify screw heads when necessary.
Finally, keep a hammer and center punch on hand to mark the screw’s center, ensuring precision drilling on recessed or hardened screws.
These tools collectively enable a controlled, methodical approach to broken screw removal.
Regular maintenance of tools and fasteners helps prevent issues like screw breakage and rust buildup.
Using Penetrating Lubricants on Stuck Screws
When a screw refuses to budge, applying penetrating lubricants can break down rust and corrosion that bind it in place.
Start by spraying a generous amount of penetrating oil or rust remover around the screw head and let it sit for 15 to 20 minutes. This allows the lubricant to seep into the threads and loosen seized parts effectively.
After soaking, tap the screw head lightly with a hammer to further work the lubricant into tight areas. When ready, apply steady downward pressure while turning the screw with your driver to maximize grip and leverage.
If corrosion persists, reapply the lubricant and allow additional soaking time before attempting extraction again.
Using penetrating lubricants before heat or impact methods increases your chances of successful removal.
For best results, consider the wood type, as harder woods like Yellow Pine may require more persistent lubrication due to their higher resin content and density.
Using the Rubber Band Trick for Broken Screws
Apply a rubber band over the stripped or broken screw head to create additional grip for your screwdriver. This simple method improves traction by filling worn grooves, enabling your screwdriver to engage firmly.
Use a rubber band on a stripped screw head to boost grip and help your screwdriver hold securely.
Position an ordinary household rubber band directly on the screw head, then press your screwdriver tip down into the rubber. Turn the screwdriver slowly counterclockwise while maintaining consistent downward pressure. This technique helps prevent further stripping and maximizes torque transfer, increasing the chance of successful extraction.
Restore grip on damaged screw heads instantly. Avoid costly specialized tools. Utilize common household items effectively. Minimize frustration and effort during removal. Prevent further damage to surrounding material.
This method is ideal for screws with partially damaged heads where drill-based extraction isn’t yet necessary. For best results, act quickly as delayed treatment can make removal more difficult and potentially damage the surrounding material.
How to Drill Out Broken Screws?
To drill out a broken screw, you’ll want to kick things off by using a center drill. This helps you create a precise hole right at the center of the screw, which is crucial for making sure everything lines up perfectly for extraction.
Next up, grab some left-handed drill bits. These are a game changer! When you use them in reverse rotation, they can actually help loosen the screw as you drill. It’s a neat little trick that can really reduce the risk of causing any further damage.
Plus, it sets you up nicely for removing the screw with an extractor later on.
Always remember to unplug power tools and wear safety goggles and gloves before starting any drilling or extraction process to ensure your safety.
Center Drill Techniques
Begin by centering a drill bit precisely on the broken screw’s shaft to create a pilot hole that will guide the extractor tool. Use a center drill to make certain the hole is perfectly aligned, preventing damage to the surrounding material.
Apply steady, controlled pressure and maintain drill speed to avoid slipping. This pilot hole provides a secure grip for the extractor, increasing removal success.
Precision drilling reduces the risk of screw head damage. Proper alignment ensures the extractor bites firmly. Controlled speed prevents drill wandering. The center drill’s tapered tip initiates an accurate hole. Steady pressure minimizes tool breakage.
Following these steps methodically sets the foundation for effective broken screw extraction without worsening the issue or damaging the workpiece. Always prioritize safety measures such as wearing safety glasses and gloves to protect yourself during the drilling process.
Left-Handed Drill Bits
Left-handed drill bits serve as specialized tools designed to loosen and extract broken screws by rotating counterclockwise, the same direction you’d turn a screw out.
Begin by attaching the left-handed drill bit to your variable speed power drill, setting it to reverse rotation. Position the bit precisely on the screw’s center or pilot hole.
Apply steady, moderate pressure while drilling at a controlled speed; this action often unscrews the broken fastener as the bit bites into the metal.
If the screw resists, the drill bit’s reverse rotation can loosen it enough to grip with pliers or an extractor.
Use left-handed drill bits primarily on screws lodged deeply or stripped internally, as they reduce the risk of further damage and prepare the screw for subsequent extraction steps.
For optimal control and safety during this process, consider using tools with features such as ergonomically designed handles to reduce hand fatigue.
How to Use Screw Extractor Kits Effectively?
When dealing with a broken or stripped screw, you’ll want to drill a pilot hole into its center before inserting the screw extractor. Choose a drill bit slightly smaller than the extractor to guarantee a tight grip.
Drill a pilot hole slightly smaller than the extractor for a secure grip on broken screws.
Insert the extractor firmly into the hole, then turn it counterclockwise using a tap handle or adjustable wrench. The extractor’s reverse threads will bite into the metal, allowing you to back the screw out smoothly.
Feel the extractor bite firmly, assuring progress. Experience control as the screw loosens steadily. Avoid frustration by using the correct drill size. Save time with methodical, precise steps. Gain confidence from predictable, repeatable results.
This technique demands patience and accuracy for successful extraction. For optimal results, ensure your tools are free from debris and properly maintained to prevent performance issues during use.
Troubleshooting Screw Extractor Use
When you’re troubleshooting screw extractor use, the first thing to do is pick the right extractor bit size. It should match the drilled hole just right. You definitely want to ensure you drill a clean, centered pilot hole with the correct bit.
This gives the extractor a solid grip, which is super important.
Now, when you actually use the extractor, make sure to apply reverse rotation steadily. This helps engage the extractor threads without causing more damage to the screw.
Taking it slow and steady is key! Using precise measurement techniques can improve the accuracy of your pilot hole and extractor fit.
Extractor Bit Selection
Selecting the correct extractor bit is critical for effective screw removal and minimizing further damage. You need to choose a bit that matches the screw’s size and the hole you’ve drilled.
Too small and it will slip; too large and it may crack the screw or the bit. Consider the type of screw head, such as hex, square, or round, and pick a bit designed for that profile.
Match the extractor bit size precisely to the pilot hole diameter. Use tapered bits for deep, lodged screws to ensure a firm grip.
Avoid bits with worn or damaged flutes that reduce torque transfer. Choose hardened steel bits for rusted or hardened screws to prevent breakage.
Select bits with reverse threading that grip tighter when turned counterclockwise. This methodical selection increases your chances of a clean extraction without additional damage.
Regular maintenance and cleaning of tools, including screw extractors, help maintain their effectiveness and longevity, similar to how regular cleaning extends the lifespan of bandsaw blades.
Proper Hole Drilling
Start by centering your drill bit precisely on the screw’s core to guarantee a clean, straight pilot hole essential for effective extractor engagement.
Use a drill bit slightly smaller than the screw’s diameter to avoid compromising surrounding material.
Apply steady, controlled pressure to prevent slipping or enlarging the hole unnecessarily.
Choose a variable speed drill set to low RPM to maintain control and reduce heat buildup, which can damage the extractor.
If the screw surface is uneven, begin drilling at a slight angle, then straighten as the bit bites in.
For hardened or rusted screws, consider a center punch to create a dimple for drill bit guidance.
Accurate hole drilling secures the extractor will grip firmly, minimizing the risk of breakage or stripping during removal.
Always wear appropriate safety gear such as goggles and gloves to protect yourself during the drilling process.
Reverse Rotation Technique
During screw extractor use, applying reverse rotation plays a critical role in dislodging stubborn screws.
You’ll want to set your drill or tap handle to rotate counterclockwise, matching the extractor’s threading designed to bite into the drilled hole. This motion gradually backs the broken screw out without further damaging the surrounding material.
Keep these key points in mind:
Make sure the extractor bit fully seats in the pilot hole before reversing.
Apply steady, controlled torque; avoid sudden force that may break the extractor.
Use a variable speed drill for precise control over rotation speed.
If resistance spikes, pause to reassess hole alignment or apply penetrating lubricant.
Reverse rotation should be slow and deliberate to maximize grip and minimize slippage.
Using reverse rotation correctly greatly increases your chances of successful screw removal.
Using Alternative Tools Like Pliers and Impact Drivers
When a broken screw has an exposed portion, you can rely on needle-nose or locking pliers to gain a firm grip and carefully twist it out.
Use needle-nose or locking pliers to firmly grip and gently twist out an exposed broken screw.
Position the pliers securely around the screw’s shaft, applying steady counterclockwise pressure.
Avoid slipping, which may damage surrounding material. If the screw is recessed or tightly fixed, an impact driver becomes your next best tool.
Fit the correct bit snugly into the screw head or any accessible section. Strike the impact driver’s end with a hammer; the simultaneous rotational force and downward impact can break the screw loose.
Always apply penetrating oil beforehand to ease extraction. Use controlled, incremental strikes to prevent damage.
Both methods require patience and precision to prevent further complications during removal.
Last Resort Methods: Cutting, Superglue, and Chiseling
Although most screws can be removed using standard tools and extractors, some stubborn or severely damaged screws require last resort methods.
When extraction fails, you can try cutting a slot across the screw head with a rotary tool or hacksaw. This allows a flathead screwdriver to engage.
Alternatively, apply a drop of superglue to bond the screwdriver tip firmly to the screw head for turning.
Chiseling with a cold chisel or center punch can create a new grip point if the original recess is destroyed. These methods demand patience and steady control to avoid damaging the workpiece or tool.
- Cut a precise slot for flathead engagement
- Use superglue sparingly to avoid mess
- Chisel carefully to form a secure grip
- Avoid excessive force that damages material
- Employ pliers if any screw portion protrudes
Frequently Asked Questions
Can Broken Screws Damage My Tools During Removal?
Yes, broken screws can damage your tools during removal. When you apply excessive force or use improper techniques, you risk stripping screwdriver bits, breaking drill bits, or damaging extractor tools.
To protect your tools, use penetrating lubricants, select the correct extractor size, and apply steady, controlled pressure. Avoid forcing the tool, which can cause slippage or breakage.
Proper preparation and methodical steps reduce tool wear and enhance safe extraction.
How Do I Prevent Screws From Breaking in the Future?
You prevent screws from breaking by choosing the right size, drilling pilot holes, and applying consistent torque.
You avoid over-tightening, use quality tools, and keep screwdrivers aligned with the screw axis.
You select screws made from durable materials and lubricate threads when needed.
You regularly inspect tools for wear and replace damaged bits promptly.
What Safety Precautions Should I Take When Removing Broken Screws?
You should always wear safety goggles to protect your eyes from metal shards and debris.
Use gloves to prevent cuts when handling sharp tools or broken screw pieces.
Secure the workpiece firmly to avoid slippage.
Work in a well-ventilated area if applying penetrating oil or lubricants.
Keep your tools in good condition and use them as intended to minimize accidents.
Finally, apply steady, controlled force to avoid sudden tool slips or damage.
Are There Specific Screw Types More Prone to Breaking?
Picture a fragile thread snapping under pressure. That’s often what happens with softer metals like brass or aluminum screws, making them more prone to breaking.
You’ll also find that fine-thread screws, designed for delicate assemblies, can snap more easily if overtightened.
Additionally, screws with corrosion or manufacturing defects weaken over time. So, when working, choose hardened steel screws for durability and avoid excessive torque to minimize breakage risk.
Can Temperature Changes Affect Screw Removal Success?
Yes, temperature changes can affect your screw removal success.
Applying heat expands the metal, loosening rust and corrosion, making extraction easier.
Conversely, cooling contracts the screw, potentially breaking rust bonds.
Use a heat source like a soldering iron cautiously to warm the area, then apply penetrating oil.
Let it sit to maximize effectiveness before attempting removal.
Controlled thermal cycling can improve your grip and reduce extraction effort.
Final Word: Master the Process of Removing Broken Screws
When you encounter a broken screw, methodically assess your options. For instance, if a screw is deeply embedded and stripped, start with penetrating lubricant and the rubber band trick.
If those fail, carefully drill out the screw or use a screw extractor kit. In one case, a technician successfully removed a rusted bolt by combining lubrication and a screw extractor, avoiding damage.
Stay precise and patient, and you’ll efficiently reclaim your project without unnecessary damage.