How to Gold Leaf Wood? Master Tips for Flawless Finish
To gold leaf wood, start by thoroughly cleaning, sanding, and priming the surface with an oil-based or pigmented primer to guarantee smoothness and adhesion.
Apply a thin, even coat of adhesive size, letting it become tacky before carefully laying gold leaf sheets without wrinkles or gaps.
Use soft brushes to smooth overlaps and burnish for a flawless finish.
Finally, seal with a compatible varnish to protect the gilding. Exploring further will reveal detailed techniques and finishing tips.
Key Takeaways
- Prepare and smooth the wood surface by sanding, filling cracks, and applying multiple thin coats of pigmented oil-based primer, sanding lightly between coats.
- Apply a thin, even layer of adhesive size with a soft brush, allowing it to become tacky (10-45 minutes) before leaf application.
- Handle gold leaf carefully using a gilder’s tip or soft brush, working in a draft-free environment and wearing cotton gloves to prevent oil transfer.
- Lay gold leaf gently onto tacky adhesive, overlapping sheets by 1/8 to 1/4 inch for seamless coverage and press down with a soft brush.
- Burnish the gold leaf overlaps with a soft cloth or agate stone to blend seams and enhance reflectivity without damaging the delicate leaf.
Understanding Wood Surface Preparation
Before you apply gold leaf, you need to prepare the wood surface meticulously to guarantee proper adhesion and a flawless finish.
Start by removing all dust, dirt, and grease; this ensures the leaf adheres without interruption. For best results, consider using tools with adjustable bevels to achieve precise surface angles during preparation.
Sand the wood progressively with fine-grit sandpaper to create a smooth, even base. Roughness disrupts leaf application.
Fill any grain or imperfections with gesso or a similar filler, then sand lightly to maintain detail. Use a tack cloth to remove fine dust after sanding.
Avoid water or wet agents immediately before gilding, as moisture hampers adhesion. Traditional gilding involves applying multiple coats of gesso made from rabbit skin glue.
Seal the surface with shellac or acrylic or oil-based paint, applying multiple thin coats and sanding between them for a perfectly smooth, stable foundation that enhances the leaf’s visual quality.
Selecting the Right Primer for Wood
After preparing the wood surface meticulously, the next step is selecting a primer that guarantees excellent adhesion and enhances the gold leaf’s appearance.
Choose a pigmented oil-based primer for durability and smoothness, or traditional gesso for fine art quality.
Consider colored primers—red for warmth, yellow ocher for brightness, gray for cooler tones—to influence the gold leaf’s final look.
Ensure the primer seals the wood, blocks imperfections, and prevents moisture or tannin interference. Using a primer that properly seals the surface helps avoid issues similar to those caused by warped or damaged blades in woodworking, which can affect the final quality.
For projects requiring both indoor and outdoor durability, consider a primer like L.A. Gold Leaf Red Primer, which is designed for outdoor/indoor use and provides a smooth surface with minimal sanding.
| Primer Type | Visual Effect |
|---|---|
| Pigmented Oil-Based | Durable, smooth finish |
| Traditional Gesso | Fine art, textured base |
| Colored Primers | Warmth, brightness, cool |
Select a primer compatible with your wood and workspace safety requirements for optimal results.
Applying Primer Layers to Wood
When you’re getting ready to apply primer layers to wood, it’s super important to know a bit about the primer’s composition. This knowledge really helps ensure that you get good adhesion and durability. Primers are essential on bare wood because they block tannins that can otherwise bleed through and affect the finish.
Now, when you’re applying the primer, make sure to go for thin, even coats. Using high-quality brushes or rollers can really make a difference here.
And don’t forget to sand lightly between each layer! This helps smooth out any imperfections you might see.
Primer Composition Essentials
Although selecting the right primer might seem straightforward, understanding its composition is essential for achieving a flawless gold leaf finish on wood.
Primers for gilding are typically oil-based, containing premier resin binders that ensure excellent adhesion and moisture resistance.
Pigments like red, yellow ocher, and gray create an ideal base color that conceals surface flaws and enhances metal leaf reflectivity.
The finely ground mixture of binder and pigment produces a smooth surface, often eliminating the need for additional sealers or bole layers. Using a thin kerf blade can similarly improve precision in the preparation process by reducing material loss.
You can even blend primers to customize base colors for varied visual effects.
Before application, thoroughly clean the wood to maximize primer adhesion.
Apply thin, well-mixed coats, allowing full drying to achieve a uniform, pore-filled substrate essential for durable, visually striking gilding results. Gilding Primer is suitable for wood and seals surfaces to prepare for leaf adhesive application.
Layering Techniques Explained
Because primer layers form the foundation for successful gold leaf application, mastering their proper layering is essential.
Apply multiple coats of warm, evenly brushed primer to fill wood pores and create a smooth, stable base. Each coat must dry fully before the next to avoid cracking or uneven texture. Traditional methods use 10–12 thick hot layers, followed by thin bole layers for burnishing. Proper maintenance practices of tools and materials during this process can significantly impact the final finish quality.
Gold leaf often comes in extremely thin sheets measuring 5 inches by 5 inches, so preparing a smooth surface is crucial to prevent tearing or wrinkling during application.
Focus on these key points to perfect your layering technique:
Ensure consistent thickness and avoid air bubbles by using thin, steady strokes. Wait for primer to transition from cloudy to clear before applying the next coat. Clean brushes immediately after use to prevent adhesive residue hardening.
Surface Smoothing Tips
Even the finest gold leaf won’t adhere properly if your wood surface isn’t impeccably smooth before priming.
Begin by scraping, filling cracks with wood putty, and sanding with fine-grit paper (220-320 grit) to create a uniform base. Remove all dust with a tack cloth to prevent imperfections and ensure precise alignment of subsequent layers.
Apply thin, even coats of oil-based or acrylic primer, allowing full drying between layers to avoid tackiness that can disrupt adhesion.
Lightly sand between coats to enhance smoothness and bonding.
Choose a primer color thoughtfully, as it subtly influences the gold leaf’s final tone.
Avoid high-gloss or textured primers; they can cause leaf lifting or cracking.
For porous woods, applying a layer of gesso before priming helps to fill the grain and create a smooth surface.
Choosing the Appropriate Adhesive Size
When selecting the right adhesive size for gold leafing wood, you must consider the surface type, desired finish, and environmental conditions to guarantee proper adhesion and durability.
For porous wood surfaces, water-based sizes offer ease and mirror gloss finishes indoors. Oil-based sizes provide lasting flexibility and weather resistance for exterior projects. The L.A. Gold Leaf Slow Set Size, for example, is a clear, oil-based adhesive designed specifically for gilding work, offering slow setting time ideal for detailed artistic projects. Using the correct adhesive also ensures cutting efficiency when preparing materials, much like how rear handle saws reduce friction for smoother operation.
Match the size’s open or tack time to your working pace for ideal results.
Focus on these key factors:
Surface Porosity: Choose water-based for interior, oil-based for outdoor or high-moisture wood.
Finish Requirement: Water-based size deliver high gloss; oil-based tends to matte unless burnished.
Environmental Exposure: Oil-based sizes resist humidity and temperature fluctuations better than water-based.
Techniques for Applying Adhesive Size
To apply adhesive size effectively, you must first prepare the wood surface by ensuring it’s clean, smooth, and properly sealed to control porosity and promote strong adhesion.
Use fine sandpaper to remove dust and reduce porosity. Seal porous wood with de-waxed shellac or acrylic paint, sanding the paint smooth before sizing. Water-based sizes suit porous surfaces like paper, plaster, and wood, making them ideal for wood gilding projects. Proper surface preparation also helps prevent issues such as binding blade effects when working with different wood densities.
Apply water-based adhesive size in a thin, even layer using a soft, flat brush like taklon. Avoid thick or uneven coats to prevent wrinkling or bubbles.
Cover only the areas to be gilded, as gold leaf adheres exclusively where size is applied.
Allow the size to dry until tacky, usually 10 to 45 minutes, before applying leaf.
Remember to wash brushes immediately after use to maintain their quality.
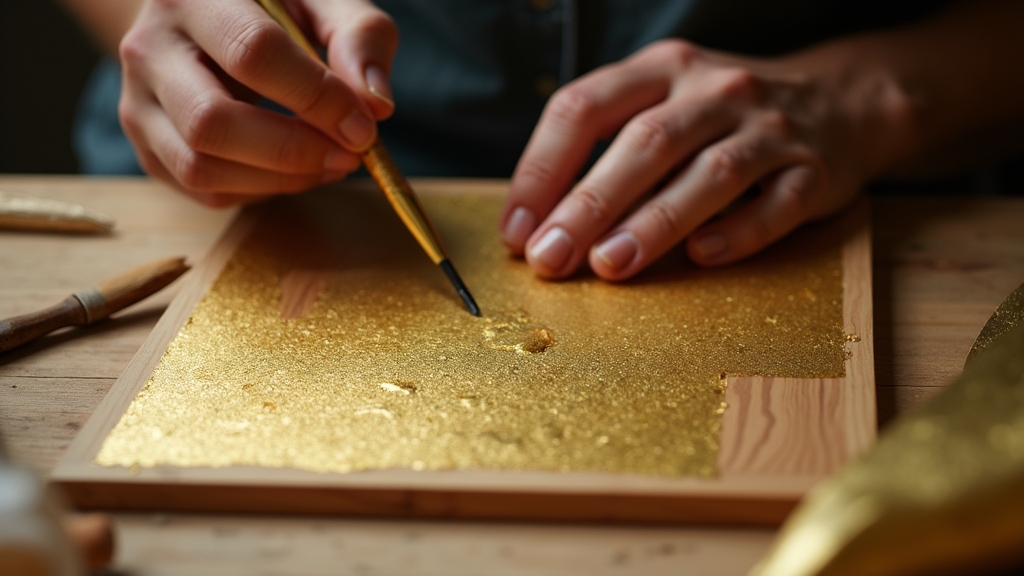
Handling and Placing Gold Leaf Correctly
Although gold leaf is incredibly delicate, careful handling and precise placement are essential to achieve a flawless gilded finish.
Use a gilder’s tip brush to pick up the leaf gently, charging it on your skin or with a tiny bit of petroleum jelly to improve control.
Work in a draft-free space, wearing lightweight cotton gloves to prevent oils from damaging the leaf. Maintaining a clean working environment is important to avoid contamination and ensure durability and protection.
Cut sheets slightly larger than the area to simplify positioning.
When placing the leaf, apply it only on fully sized, tacky surfaces, using a gentle dabbing motion or fine brushes to press it into detailed woodwork without tearing. It is important to apply adhesive size in thin, even coats for best results.
Lay leaf carefully on the adhesive, ensuring full coverage and avoiding gaps.
Use small brushes or gilders’ mops to smooth into carvings.
Keep torn pieces for patching missed spots during application.
Methods for Smoothing and Overlapping Gold Leaf
To get those beautiful, seamless overlaps with gold leaf, start by slightly overlapping the edges. Once you’ve done that, use a soft brush to gently tamp them down and blend them together. It’s all about creating that smooth look! Building a table top with sturdy materials can provide a stable workspace for your gold leaf application.
Now, when it comes to application, you’ll want to press the leaf carefully using either tissue or a soft brush. It’s best to work from the center outward. This technique helps you remove any wrinkles without risking a tear.
Just remember, gold leaf is delicate! So, handle it with light, controlled pressure. If you need to get into some tricky spots, don’t hesitate to cut the leaf to size. It’ll make your work so much easier! Also, ensure the wood surface is sanded or primed before sizing to promote better adhesion and a smooth finish.
Achieving Seamless Overlaps
When you overlap gold leaf sheets by about 1/8 to 1/4 inch, you guarantee full coverage and prevent gaps that can disrupt the flawless appearance.
To achieve seamless overlaps, gently press down edges with a soft brush or your hand to ensure adhesion and hide seams.
Afterward, use a soft cloth or agate stone to burnish overlapping areas, blending transitions for a continuous gold surface.
Manage excess leaf by lifting it carefully for reuse, minimizing waste. This careful handling is essential because gold leaf is extremely delicate and can easily tear or crumple if not managed properly. Additionally, maintaining a clean work environment with effective dust management helps preserve the delicate surfaces during the gilding process.
Key steps include:
- Applying consistent, light pressure to avoid tearing or lifting.
- Burnishing edges to enhance reflectivity and uniformity.
- Collecting and reapplying skewings to fill minor gaps and holidays.
These methods ensure a smooth, visually uniform finish across your gilded wood surface.
Techniques for Smooth Application
Overlapping gold leaf sheets smoothly establishes the foundation, but mastering the application techniques guarantees a flawless finish across the entire wood surface.
Begin by applying a thin, even layer of water-based gilding paste with a soft brush, ensuring it’s tacky, not dry, before laying the leaf. Shake the gilding paste before use to ensure consistent texture and adhesion.
Use a soft flat brush to press overlapping edges gently, feathering to minimize seams without causing wrinkles or tears.
After initial application, carefully add sizing and small patches to fill gaps, creating seamless joins.
Smooth the adhesive layer with a rubber tool to prevent ridges, and remove dust thoroughly before gilding to avoid bumps. Wiping the wooden surface with a non-greasy baby wipe beforehand helps eliminate dust and grime, ensuring a clean base for the adhesive.
Handle leaf sheets delicately with tweezers or brushes to maintain integrity.
Post-application, wait for full drying before brushing off excess gold to preserve adhesion and surface uniformity.
Preventing Leaf Tearing
Although gold leaf is incredibly delicate, you can prevent tearing by mastering precise overlapping and smoothing methods. Start by aligning sheets edge-to-edge carefully and slightly overlapping them on tacky sizing to ensure seamless coverage without gaps. Using wet paper towels during application helps keep the leaf moist and stable, reducing the risk of tears.
Use a soft, natural hair brush with gentle feathering motions to blend seams and press overlaps smoothly, avoiding harsh rubbing that damages edges. Key techniques include trimming leaf sheets pre-application for neat edges that overlay cleanly.
Applying sizing evenly and waiting until tacky before leaf placement reduces slippage. Employ soft brushes or lightly rolled paper towels to burnish overlaps without abrasion.
These expert methods minimize stress on fragile leaf edges, guaranteeing a flawless, continuous gold surface without tears.
Burnishing and Finishing the Gold Leaf Surface
Since gold leaf is extremely delicate, you’ll need to use soft bristle brushes or clean cotton cloths to burnish the surface gently, avoiding wrinkles or tears.
Use light, even strokes, and keep your tools clean to prevent scratching from accumulated gold particles.
Employ specialized tools like a Gilder’s dusting mop to blend seams and push gold into fine crevices, ensuring seamless coverage.
Periodically inspect your tools during burnishing, maintaining softness and cleanliness.
For finishing, gold’s natural tarnish resistance means protective coatings are often unnecessary outdoors. Gold leaf is durable and does not require sealing.
But for touchable surfaces, apply multiple thin layers of clear varnish to enhance durability without compromising appearance.
Controlled burnishing pressure can also create artistic textures, elevating your gilded woodwork with subtle visual effects.
Setting Up Your Workspace and Essential Tools
Before you begin applying gold leaf, prepare a workspace that balances cleanliness, stability, and controlled conditions to handle this delicate material effectively.
Choose a dust-free area with minimal airflow to prevent the leaf from blowing away. Ensure excellent lighting so you can see every detail on the wood surface. Set up a stable table at a comfortable height to maintain accuracy and reduce fatigue. It is important to handle metal leaf with talcum powder on your fingers to prevent it from sticking during application.
Gather essential tools within easy reach to streamline your workflow: gilder’s tip and soft bristle brushes for handling and smoothing gold leaf, sandpaper and primer to prepare and seal the wood surface, and dedicated brushes and containers for applying gold size adhesive.
This precise setup guarantees you work efficiently, protecting the fragile gold leaf and achieving a flawless application.
Protecting and Sealing the Gilded Wood Surface
To keep your gold leaf looking its best, choosing the right sealer is super important. You should go for metal leaf sealers or dewaxed shellac that are specially made for gilded surfaces.
Sealing prevents tarnishing, especially for imitation leaf with copper content.
It’s really crucial to wait until the gold leaf has completely dried before you apply the sealant. If you don’t, you might end up lifting the leaf or trapping moisture underneath, which is definitely not what you want!
When you do apply the sealant, make sure to do it in a thin, even layer. This way, you’ll get the best protection possible without losing that gorgeous metallic shine.
Choosing Appropriate Sealers
Although gold leaf adds a stunning metallic finish to wood, you must choose the right sealer to protect and preserve its delicate surface. Selecting a sealer compatible with your gold leaf type (genuine or imitation) and underlying wood is essential to prevent tarnishing, dulling, or peeling. Proper sealing is crucial because gold leaf can tarnish over time if left unprotected.
Liquid metal leaf sealers offer precise application for intricate details, while sprays efficiently cover large areas but may need multiple coats. Brand-specific sealers, like those from Mona Lisa, minimize discoloration risks.
Consider these key factors when choosing a sealer:
- Compatibility with gold leaf and wood substrate
- Desired finish—matte, satin, or gloss
- Long-term durability against UV, moisture, and dust
Timing Sealant Application
Once the gold leaf has fully adhered and dried, you should apply the sealant carefully to preserve the delicate finish and prevent tarnishing.
Wait several hours to overnight after gilding to ensure complete drying and proper adhesion.
Apply thin, even layers of a sealant formulated specifically for gold leaf, avoiding general varnishes with harsh solvents that can dull or damage the leaf.
For example, using French polish as a sealer can enhance the gold’s sparkle and give an antique finish.
Allow each layer to dry thoroughly before adding the next to maintain clarity and avoid cloudiness.
Perform sealing in a clean, dust-free environment with controlled temperature and humidity, as high moisture slows drying and extreme conditions impair curing.
Avoid direct airflow to prevent leaf displacement.
Proper timing and environment guarantee durable protection while maintaining the gold leaf’s brilliance.
Frequently Asked Questions
Can I Gold Leaf Over Painted Wood Surfaces?
Yes, you can gold leaf over painted wood surfaces if the paint is fully dry, smooth, and properly prepared.
You’ll want to lightly sand glossy finishes to improve adhesion.
Apply a specialized sizing evenly and wait for it to become tacky before laying the gold leaf carefully.
Handle the leaf with clean hands or soft tools.
Then seal the surface with an appropriate clear coat to protect and preserve the gold leaf finish.
What Is the Best Way to Store Unused Gold Leaf Sheets?
Did you know that gold leaf can last for years if stored correctly?
To keep your unused sheets pristine, always store them in their original gilding books or airtight containers to prevent tarnish and physical damage.
Keep them flat, away from humidity, heat, and reactive materials. Use silica gel packs to maintain stable dryness.
Handle sheets with gloves or tools to avoid oils and moisture. Label and rotate stock for best results.
How Do Humidity and Temperature Affect Gold Leaf Application?
Humidity and temperature critically affect gold leaf application. If humidity’s too high, adhesive dries slowly, risking bubbles; too low, it dries too fast, reducing tack.
Aim for 60–80% humidity for ideal adhesion. Temperatures between 65–75°F (18–24°C) stabilize drying and bonding.
Cooler temps slow adhesive cure, warmer temps speed it up but shorten working time. Sudden temperature shifts can cause cracking or delamination, so maintain stable, moderate conditions for best results.
Are There Eco-Friendly Alternatives to Traditional Gold Leaf Adhesives?
Looking for eco-friendly alternatives to traditional gold leaf adhesives?
You’ve got options like plant-based adhesives, such as wheat paste or rice glue, that are biodegradable and non-toxic.
Natural resins like damar offer strong adhesion with a traditional touch.
Water-based acrylics reduce environmental impact while maintaining durability.
Even casein glue, made from milk protein, works well indoors.
Why settle for harmful solvents when you can choose sustainable, effective adhesives that protect both your art and the planet?
Can Gold Leaf Be Removed or Repaired if Damaged?
Yes, you can remove or repair damaged gold leaf, but you must work carefully. Start by gently peeling or soft brushing to avoid harming the substrate.
For repairs, clean the area, apply fresh adhesive, and lay new leaf in thin layers to blend seamlessly.
Chemical solvents can help break down leaf and adhesives but use them cautiously and neutralize afterward.
Protect surrounding gilding and always test methods on small sections first.
Take Your Wood Projects to the Next Level with Gold Leaf
Think of gold leafing wood like weaving a delicate tapestry. Each step, from prepping the surface to sealing the finish, must be precise and patient.
Just as a single loose thread can unravel a fabric, skipping primer or rushing adhesive application can ruin your gilded masterpiece.
Remember, meticulous layering and careful burnishing transform fragile sheets into a stunning, durable surface that glows for years. Your attention to detail truly makes all the difference.