How to Cut Stair Stringers: Accurate Layout for Safe Stairs
To cut stair stringers, start by selecting straight, high-quality pressure-treated 2×12 lumber. Set your framing square with stair gauges to match precise riser and tread dimensions.
Mark your stringer carefully, then make initial cuts with a circular saw. Stop at layout intersections to avoid overcuts. Finish with a jigsaw or handsaw for exact corners and adjust the bottom edge for a flush fit.
Use your first stringer as a template to guarantee consistency and structural accuracy. Detailed steps will guide you further.
Key Takeaways
- Select straight, high-quality pressure-treated 2×12 lumber free of warps and knots for durable stair stringers.
- Use a framing square with stair gauges to accurately mark riser heights and tread depths on the stringer.
- Set circular saw blade depth slightly deeper than board thickness and cut carefully on the waste side of layout lines.
- Stop cuts precisely at 90-degree intersections and finish tight corners using a jigsaw or handsaw to prevent overcuts.
- Trim the bottom edge for a flush fit on the floor, test fit stringer, and make fine adjustments as needed.
Choose the Right Lumber for Stair Stringers
Select straight, high-quality pressure-treated 2×12 lumber when choosing stair stringers. Make certain the boards are free from warps, twists, or significant knots, as these defects compromise structural integrity.
For stringers resting directly on the ground, verify the lumber meets a .60 RET level to resist decay effectively. Position the crown side of the board on the cut side during preparation to maintain strength and stability.
Lay the boards flat on stable sawhorses to facilitate accurate marking and cutting. Transfer your riser height and tread depth measurements from the stair calculator precisely onto the lumber.
This careful material selection and preparation will set a solid foundation for your stair stringers, ensuring durability, safety, and ease in subsequent cutting and assembly steps. Before cutting, it is important to check the alignment of your saw’s fence and blade to ensure precise cuts.
Set Up Your Framing Square and Stair Gauges
Begin by attaching your stair gauges securely to the framing square. Place one on the tongue to measure riser height and the other on the body to gauge tread depth.
Adjust each gauge to match your calculated riser and tread measurements precisely. Lock them firmly in place to prevent any movement during layout.
When positioned correctly, the stair gauges allow you to rapidly mark consistent step dimensions along the stringer board’s edge.
Make certain the framing square rests flat against the board with the gauges aligned flush to its edge to maintain accuracy.
This setup guarantees uniform riser and tread marks, essential for precise cuts and structural stability.
Double-check gauge positions before marking to avoid costly errors during the cutting phase.
For enhanced precision, consider using tools with adjustable fences to maintain consistent and repeatable measurements throughout your project.
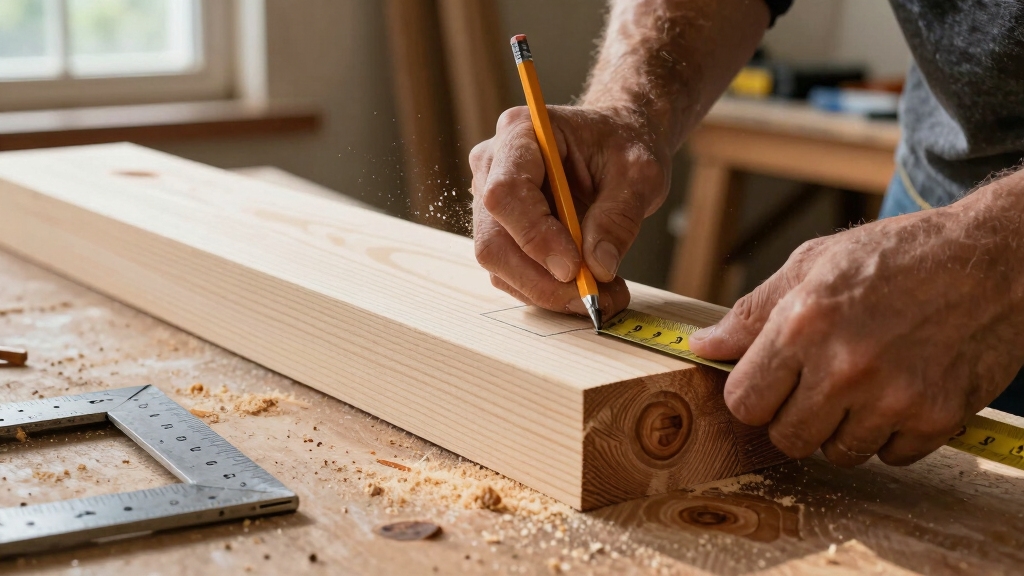
Measure and Mark Riser Heights and Tread Depths on Stringers
Alright, let’s kick things off! First, grab your stair gauges and attach one to the tongue of your framing square for the riser height. The other one goes on the body for the tread depth. It’s really important to align them carefully with the edge of your 2×12 stringer board. That way, you’ll transfer those measurements accurately.
Now, don’t forget to repeat this marking process for each step. It’ll help ensure that your cuts are consistent and precise. Trust me, taking the time to do this right will pay off in the end!
For best results, use a carpenter’s square to verify your markings are perfectly square before making any cuts.
Using Stair Gauges
When you use stair gauges on a framing square, you ensure consistent and accurate measurements of riser heights and tread depths on your stringers. Attach one stair gauge to the tongue for riser height and the other to the body for tread depth.
Align both gauges with the board edge, then mark the first step’s riser and tread. Repeat this process for each step, making sure each mark is parallel and precise. This method prevents layout errors and guarantees uniform cuts essential for stair stability.
| Component | Attachment Point | Purpose |
|---|---|---|
| Riser Gauge | Square tongue | Measures riser height |
| Tread Gauge | Square body | Measures tread depth |
| Board Edge | Reference alignment | Makes certain consistent layout |
For optimal results, ensure your work surface is stable and level, as these design considerations significantly impact the precision of your measurements and cuts.
Transferring Measurements Accurately
After setting your stair gauges and marking the riser heights and tread depths with the framing square, you’ll need to transfer those measurements directly onto your stringer boards. This step demands accuracy to guarantee each step fits perfectly and the staircase remains stable.
Follow these steps to transfer measurements precisely:
- Align the framing square’s tongue with the board’s edge, marking each riser height.
- Shift the square’s body to mark tread depths consistently along the board.
- Repeat this process step-by-step down the length of the stringer, guaranteeing marks are clear and sharp.
- Double-check all measurements before cutting to avoid costly mistakes.
Accurate transfer is vital for structural integrity and safety in stair construction. Using push sticks and safety gear during the cutting process can help maintain control and reduce the risk of injury.
Cut Stair Stringers Safely With a Circular Saw
Before you start cutting, it’s important to set your circular saw blade depth just right. You want to avoid cutting too deep. Trust me, it makes a huge difference!
As you go, keep your eye on those marked lines. Staying aligned with them helps ensure that your cuts are accurate.
And don’t forget—when you reach those 90-degree intersections, stop cutting right there. This helps prevent any overcuts that could weaken your stringer. It’s all about precision!
Additionally, maintaining a comfortable working height while cutting can reduce fatigue and improve accuracy during the process.
Proper Saw Setup
Set up your circular saw carefully to guarantee clean, accurate cuts when cutting stair stringers.
Begin by adjusting the blade depth so it extends just beyond the thickness of the 2×12 board to minimize tear-out and maintain control.
Make certain the saw’s base plate sits flat against the board for stability during cutting.
Confirm the blade is sharp and appropriate for framing lumber to achieve smooth edges.
Finally, check the alignment of the blade with your layout lines before starting.
- Adjust blade depth slightly deeper than board thickness.
- Secure saw base plate flat on material.
- Use a sharp, framing-compatible blade.
- Verify blade alignment with marked cut lines.
This setup prevents overcutting and promotes precise, safe stair stringer cuts. Using an edge guide can help maintain straight cuts and improve accuracy during the process.
Cutting Along Lines
When you cut along the layout lines, keep the circular saw blade aligned precisely with the marked edges to guarantee clean, accurate cuts.
Position the saw so the blade’s kerf stays exactly on the waste side of the line without crossing it.
Maintain steady control, guiding the saw slowly to avoid deviation.
Cut only to the intersection where the riser and tread lines meet at a 90-degree angle; stopping here prevents structural weakening.
Use a saw with a sharp blade set to the correct depth, just enough to cut through the stringer thickness.
Support the board firmly on sawhorses to avoid movement or binding.
Precision in this step secures strong, stable stringers and a professional stair assembly.
Wearing proper eye and ear protection while cutting ensures safety and helps maintain focus during this precise work.
Avoiding Overcuts
Although cutting stair stringers with a circular saw speeds up the process, you must avoid overcuts to maintain structural integrity. Overcutting weakens the stringer and compromises safety.
To prevent this, follow these steps carefully:
- Align the saw blade precisely with your layout lines, never cutting beyond them.
- Stop the cut exactly where two layout lines meet at a 90-degree angle intersection.
- Use a jigsaw or handsaw to finish cuts in corners and tight spots for greater control.
- Check your progress frequently and adjust your technique to avoid accidental blade drift.
When working with thick lumber, consider the cutting depth limitations of your circular saw to ensure clean, accurate cuts without damaging the material.
Finish Cuts With a Jigsaw or Handsaw for Precision
You’ll often find that a circular saw can’t reach the tight corners and intricate angles required to complete the stair stringer cuts accurately.
To achieve clean, precise edges, switch to a jigsaw or handsaw for these finish cuts. Carefully follow your layout lines, ensuring you don’t overcut beyond the markings.
Use the jigsaw for curved or confined areas where maneuverability is limited, and the handsaw for fine control in narrow spaces.
Take your time to maintain the integrity of the stringer’s structure. Focus on trimming the bottom edge of the stringer so it sits flush on the floor without gaps.
These final cuts are vital for a stable, safe staircase, providing a smooth fit for treads and risers while preserving the strength of the stringer board.
For enhanced precision and smoother workflow, consider using tools with features like micro-adjustments to 1/64 inch for fine cutting control.
Adjust the Bottom of Your Stringer for a Proper Fit
Trim the bottom edge of your stringer carefully to ensure it fits snugly against the floor. This adjustment guarantees the stringer rests flush, providing stability and preventing uneven steps.
Remove an extra inch and a half from the tread at the bottom to accommodate for tread thickness and avoid having to recut in place.
Follow these steps for accuracy:
- Measure and mark the bottom edge, accounting for floor height and tread thickness.
- Use a circular saw to make initial cuts along the marks without overcutting.
- Finish the cut with a handsaw or jigsaw to clean tight corners.
- Test fit the stringer to the floor, trimming further if necessary for a flush, secure fit.
Use the First Stringer as a Template for Others
Once you’ve cut the first stringer accurately, use it as a template to mark the remaining stringers. Lay the completed stringer flat on the new boards and clamp it firmly in place to prevent shifting.
Trace the outline precisely with a sharp pencil, guaranteeing all riser and tread cuts transfer exactly. This method guarantees uniformity in dimensions and angles across all stringers, reducing errors that could compromise stair stability.
After marking, double-check alignment with your framing square and stair gauges before cutting. Using your first stringer as a template not only saves time but also guarantees each subsequent stringer matches perfectly, maintaining structural integrity and a professional finish throughout your staircase build.
Check and Fine-Tune Stringer Angles and Levels
After using the first stringer as a template to mark and cut the others, verify that each stringer’s angles and levels are accurate before installation.
Precision here guarantees stair safety and uniformity. Use a spirit level and framing square to check riser angles and tread levels. Fine-tune any discrepancies with a block plane or sanding.
Ensuring precise angles and levels with a spirit level and framing square is key to safe, uniform stairs.
Follow these steps:
- Place the stringer on a flat surface and use a spirit level on each tread to confirm horizontal alignment.
- Check the overall stringer angle against the standard 38 degrees using a framing square.
- Adjust minor deviations by planing or sanding the stringer’s edges.
- Recheck all measurements after adjustments to guarantee consistent riser heights and tread depths.
This process guarantees structural integrity and a professional finish.
Frequently Asked Questions
What Tools Are Essential Besides Saws and Framing Squares?
You’ll need stair gauges to attach to your framing square for consistent riser and tread markings. A jigsaw or handsaw is essential for finishing cuts in tight corners.
Use a spirit level to check each step’s level during installation. A block plane helps smooth out inconsistencies or fine-tune cuts.
Finally, sawhorses provide a stable work surface for marking and cutting your stringer boards accurately.
How Do Weather Conditions Affect Stair Stringer Durability?
You might think weather could turn your stair stringers into dust overnight, but moisture and temperature swings actually cause the real havoc.
When exposed to rain or ground moisture, untreated or low-quality wood absorbs water. This leads to warping, rot, and weakened structural integrity.
To enhance durability, always use pressure-treated 2x12s with a .60 RET level. Make certain proper sealing and drainage.
This prevents premature failure and keeps your stairs safe and stable.
Can Stringers Be Cut for Curved or Spiral Staircases?
Yes, you can cut stringers for curved or spiral staircases, but it requires advanced layout and cutting techniques.
You’ll need flexible templates and precise measurements for radii and angles. Use a combination of framing squares, stair gauges, and custom jigs.
Cutting involves gradual curves rather than straight lines, often requiring jigsaws or bandsaws for accuracy.
Make certain each step’s rise and run conform to your design to maintain structural integrity and safety.
What Safety Gear Is Recommended When Cutting Stringers?
Safety starts with sturdy safeguards: you should always wear safety glasses to shield your sight from sawdust and debris.
Ear protection is essential to muffle the circular saw’s sharp sounds.
Don’t forget heavy-duty gloves to guard your grip and hands from splinters or accidental cuts.
A dust mask prevents inhaling harmful particles while cutting.
Finally, sturdy boots with non-slip soles keep your footing firm and prevent falls during stringer cutting.
How Do I Calculate Total Stringer Length Needed for Stairs?
To calculate total stringer length, start by measuring your total rise, the vertical height from the lower floor to the upper floor.
Multiply the number of risers by your chosen riser height, commonly 7.5 inches.
Use the Pythagorean theorem with rise and run, which is tread depth times number of treads, to find the hypotenuse.
This is your stringer length.
This precise measurement guarantees your stringers fit correctly for safe stair construction.
Build with Precision: Crafting Stair Stringers Like a Pro
Now that you’ve mastered cutting stair stringers, imagine wielding your framing square like a pro sculptor chiseling marble. Each precise cut transforms raw lumber into a flawless staircase foundation.
With careful measuring, safe cutting, and exact adjustments, your stringers will fit so perfectly they seem engineered by a master craftsman. Trust your skills, use your tools confidently, and you’ll build stairs that not only stand solid but look like they belong in a magazine spread.