How to Cut 2×4 With Circular Saw? Step-By-Step Guide
To cut a 2×4 cleanly with a circular saw, start by securing your workpiece and marking your cut line clearly, accounting for the blade’s kerf.
Adjust the saw blade depth just past the board thickness, and use a straightedge or guide to keep your cut straight. Wear safety gear and keep hands clear of the blade path. Steady your saw with both hands and cut slowly for a smooth edge. Follow these steps, and you’ll master precise, safe cuts easily.
Key Takeaways
- Measure and mark the 2×4 accurately using a tape measure and speed square, marking the waste side for kerf allowance.
- Set the circular saw blade depth to just exceed the 2×4 thickness and ensure the blade is sharp and appropriate for ripping.
- Secure the 2×4 firmly with clamps on a stable surface like sawhorses before cutting to prevent movement.
- Use a straightedge or rip fence guide aligned with the cut mark to ensure a straight, clean cut.
- Wear safety gear, keep hands clear of the blade, and make slow, steady cuts while standing to the side for safety.
Preparing Your Workspace for Safe Cutting
Before you start cutting your 2×4 with a circular saw, make sure your workspace is clear of debris and obstructions to move safely and work efficiently.
Remove all loose items, including nails or screws that could interfere with your cut. Clear trip hazards like cords, loose tools, or debris before starting to maintain a tidy workspace. Applying lubricant on blades can also help reduce friction and heat during cutting.
Clear your workspace of debris and loose items to ensure a safe, efficient cut with your circular saw.
Clamp the 2×4 firmly to a stable surface to prevent movement. Tie back loose hair, clothing, and jewelry to avoid entanglement with the saw.
Ensure your workspace is well-lit so you can clearly see the cutting line. Wear appropriate safety gear like goggles, a dust mask, and ear protection.
Double-check that the saw guard is functional and your stance keeps you safely to the side, reducing kickback risk.
Selecting and Inspecting the Right Circular Saw
To cut a 2×4 efficiently, choose a sidewinder circular saw with a 7¼-inch blade for the right balance of power and maneuverability. Considering the motor power and performance of your saw can also help you handle cutting through denser wood with ease.
Before you start, inspect the blade for sharpness, damage, and compatibility with your saw’s arbor size. A well-maintained blade guarantees clean cuts and safer operation.
Additionally, selecting blades optimized for ripping, typically with 16–24 teeth, can help reduce tear-out and improve cut quality.
Choosing Appropriate Saw Type
When selecting the right circular saw for cutting 2x4s, you’ll want to focus on the saw type that matches your specific needs and tasks.
For light, precise cuts or plywood, a sidewinder saw is maneuverable and easy to handle. These saws typically feature compact, lightweight designs, making them easy to transport and use.
If you’re tackling heavy-duty framing, consider a worm-drive or hypoid saw for their high torque and durability. Keep in mind that integrating advanced safety features like braking mechanisms can vary depending on saw design.
Cordless saws offer portability, ideal if you need to move around frequently, but remember some models don’t include batteries. Corded saws provide consistent power at a lower cost, making them great for budget-conscious projects.
Also, check weight and ergonomics; lighter saws reduce fatigue. Choose blade size and speed based on your cut type, and prioritize saws with good visibility and comfortable grips to improve control and safety during your work.
Inspecting Blade Condition
Although selecting the right blade is crucial, regularly inspecting its condition guarantees safe and efficient cutting. Before each use, check the blade for cracks, chips, loose or missing teeth, warps, and burn marks. Confirm the blade matches the material you’re cutting and is rated for your saw’s RPM or higher.
Verify the blade is securely tightened and aligned on the arbor to prevent wobbling or loosening during operation. Use only the designated key to install or remove the blade, and confirm the blade guard functions properly.
A damaged or dull blade compromises cut quality and safety, so replace it promptly when defects appear. Regular inspections maintain performance and protect you from accidents while cutting 2x4s with your circular saw.
Marking Your 2×4 Accurately for Cutting
Since accurate cuts start with precise markings, you’ll need the right tools and techniques to mark your 2×4 correctly. Begin by measuring the desired cut length with a tape measure, then place a speed square firmly against the wood at the mark.
Use a sharp pencil or marking knife to draw a straight, perpendicular line across the board. Mark both faces if your 2×4 is thick to maintain line continuity. Remember to account for the blade’s kerf by marking the cut line on the waste side.
Double-check your measurements from both ends to avoid mistakes. For repetitive cuts, consider setting up a stop block or jig to ensure consistency. Clear, dark lines improve visibility, helping you align your saw precisely when you’re ready to cut.
When selecting your saw, consider the cutting capacity to match your project needs and material thickness. It’s also helpful to measure back from your cut line by the distance from the blade to the saw’s guard, which is typically about 1 1/8 inches, to ensure perfect alignment before cutting.
Setting Up the Circular Saw for Precision Cuts
Before you start cutting, set up your circular saw carefully to guarantee every cut is precise and clean. First, adjust the blade depth so it just clears the thickness of your 2×4, avoiding over-cutting.
Choose the right blade—use a rip blade for cuts along the grain or a crosscut blade for cuts across it. Using a blade with a higher tooth count can significantly improve the finish quality of your cuts and reduce tear-out.
Secure your workpiece firmly with clamps to prevent movement. Check that the sole plate is parallel to the blade and calibrate the bevel angle, usually 90 degrees for straight cuts. It is important to use the saw’s depth adjustment feature to customize the cutting depth based on your material’s thickness.
Always keep the blade guard in place and wear safety glasses and hearing protection. Make certain your work area is clear, and use dust collection to maintain visibility. Proper setup leads to accurate, clean cuts every time.
Using Guides and Jigs for Improved Accuracy
When you want consistently straight and accurate cuts, using guides and jigs with your circular saw makes all the difference.
Build a straight edge guide from plywood or a straight board to keep your saw on a precise path, especially for rip and crosscuts. Ensuring your blade has proper installation is key to maintaining cut accuracy and safety.
For repeated crosscuts at right angles, a crosscut jig offers stability and quick adjustments. You can also use ready-made options like Kreg rip-cut guides for quick, clamp-on setups, though these may be limited in length.
Homemade jigs, while requiring more setup time, offer customization and higher precision for unique projects. A well-designed jig often includes features like a grooved fence to prevent wood chips from clogging the cutting area, which helps maintain smooth and consistent cuts.
Confirm your guides are flat and secure with clamps or adhesive grip pads to prevent slippage and maintain accuracy throughout your cuts.
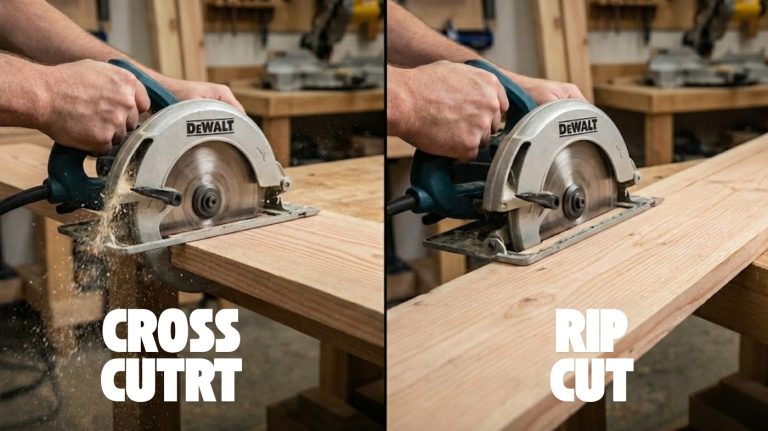
How to Perform Straight Rip Cuts on a 2×4?
Below are the essential steps and tips to ensure clean, accurate cuts.
Rip Fence Setup
Three key steps guarantee a rip fence helps you make straight rip cuts on a 2×4: selecting a compatible fence, securely attaching it to your circular saw, and precisely aligning it with the cut line.
First, choose a rip fence designed for your saw model or a sturdy custom-made alternative. Next, firmly mount the fence onto the saw’s slides or channels to prevent any shifting during cutting.
A rip fence typically attaches to circular saw by inserting laterally into a slot on the saw’s sole plate with thumb screws, ensuring stable placement. Positioning the fence on the correct side of the saw improves both cutting accuracy and safety.
Finally, use a speed square to align the fence parallel to the blade and set it at the correct distance from the 2×4’s edge. This setup ensures the fence guides the saw evenly, reducing cantilever effects.
When properly adjusted, the rip fence maintains a consistent distance, helping you achieve clean, accurate rip cuts every time.
Securing the 2×4
After setting up your rip fence for an accurate guide, the next step is securing the 2×4 firmly before making your cut. Position your clamps well away from the cutting path to avoid damage or obstruction.
Use bar or F-style clamps to grip the wood tightly, preventing any movement. Support the 2×4 on a sawhorse or stable surface to maintain balance.
Ensure your work area is clear to keep it safe and efficient. Proper support and secure clamping reduce the risk of blade twisting caused by unstable workpieces. Remember that the quality of a straight cut also depends on having a straight edge on the wood itself.
| Task | Recommendation | Reason |
|---|---|---|
| Clamp Position | Away from cutting path | Prevents saw damage |
| Clamp Type | Bar or F-style clamps | Secure grip on wood |
| Support | Use sawhorse | Maintains stability |
Maintaining Blade Alignment
Because a properly aligned blade is essential for clean, straight rip cuts, you need to verify that the blade is installed correctly and set perpendicular to the saw’s baseplate.
Begin by ensuring the blade teeth face the front underside of the baseplate to push the wood properly. Use a square to check that the blade is at a 90-degree angle; adjust the bevel to 0 degrees for perfect alignment.
Always engage the shaft lock when adjusting the blade to prevent movement. Small deviations in bevel angle can cause errors in projects that affect the overall accuracy.
Key steps to maintain blade alignment:
- Confirm the blade rotates in the direction indicated on the guard.
- Secure the saw’s baseplate on a flat surface for stability.
- Perform test cuts to verify alignment before starting your project.
Techniques for Clean Cross Cuts With a Circular Saw
When making cross cuts with a circular saw, you’ll need to focus on precise alignment and steady control to achieve clean, accurate results.
Start by marking your cut line clearly and use a speed square as a guide to keep the saw straight. Secure the guide with clamps to prevent movement to stabilize the board.
Mark your cut line clearly and clamp a speed square guide for straight, accurate cuts every time.
Align the saw blade exactly with the cut line before cutting. Maintain a slow, steady motion with consistent pressure to avoid splintering and tear-out.
Support the 2×4 fully on a stable surface or saw horses to prevent shifting. Choose a crosscut blade designed for clean cuts across the grain, and ensure it’s sharp. Double-check measurements before cutting, and consider the kerf width to avoid material waste.
Maintaining Safety Throughout the Cutting Process
Before you start cutting, make sure you’re wearing proper safety gear like eye protection and a dust mask.
Prepare your workspace by securing the 2×4 and clearing any debris to maintain control and prevent accidents. It is important to clamp workpieces securely to prevent movement during cutting.
After the cut, always wait for the blade to stop completely before setting the saw down to avoid injury.
Proper Safety Gear
Although cutting a 2×4 with a circular saw can be straightforward, you must wear proper safety gear to protect yourself from debris, noise, and dust throughout the process.
Start by wearing safety glasses or goggles to shield your eyes from flying wood chips. Use earplugs or earmuffs to reduce noise exposure, especially during extended cutting sessions. Additionally, wear a dust mask or respirator to prevent inhaling sawdust.
- Use tight-fitting clothing and avoid loose sleeves or jewelry that could get caught.
- Operate the saw with bare hands for better grip and control; gloves may interfere.
- Always check that the saw’s blade guard is functional before starting.
Workspace Preparation
To maintain safety throughout the cutting process, you need to prepare your workspace thoughtfully. Clear debris to prevent tripping and ensure a stable, flat surface for the 2×4.
Position your workbench or sawhorses at a comfortable height with adequate lighting. Secure the 2×4 using clamps—never hold it by hand—and place scrap wood underneath to support cut ends and avoid splintering.
Check and remove any nails or metal objects before cutting. Adjust the circular saw blade depth to about 1/8 inch deeper than the wood thickness. Verify the blade is sharp, tightly secured, and safety guards function properly.
Always wear safety goggles or glasses with side shields to protect your eyes during cutting. Stand to the side of the blade path with a balanced stance, keep both hands on the saw, and maintain a clutter-free, well-ventilated area to move safely and minimize dust inhalation.
Post-Cut Safety Steps
Once you finish cutting, always pause to inspect your circular saw and workspace to maintain safety for your next steps. First, let the blade stop spinning completely before setting the saw down or handling it.
Check the blade for any cracks or missing teeth and ensure the safety guard operates smoothly. Clear away wood splinters, debris, and cut-off pieces to prevent accidents. Always wait for the saw to fully spin down before placing it in storage or on a surface.
Keep these key post-cut safety steps in mind:
- Secure cut 2x4s with clamps or supports to avoid movement.
- Unplug the saw before changing blades or storing it.
- Wipe down the saw and workspace to remove dust and particles.
Checking and Finishing the Cut 2×4 Pieces
Before moving on, make sure you thoroughly check your cut 2×4 pieces for accuracy and quality. First, use a speed square to verify the cut edge is perfectly square and aligns with your marked line.
Measure the length to confirm it meets your specifications. Lay the board flat to detect any warping or twisting. Inspect the cut for splintering or roughness, which might indicate a dull blade or uneven cut.
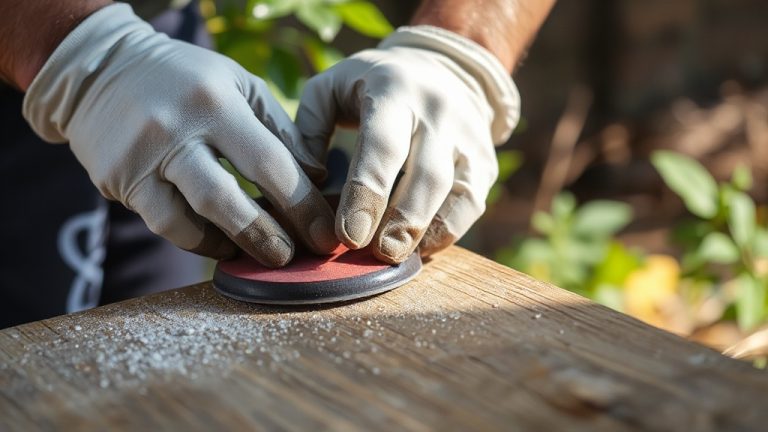
Since circular saws are ideal for cutting 2 x 4s, choosing the right blade size can improve cut quality. Next, sand the edges with medium-grit sandpaper to smooth any burrs or splinters, always wearing gloves for protection.
Remove sawdust with a brush or vacuum before fitting the piece. Finally, test-fit the 2×4 in its intended spot to ensure precise dimensions and make minor adjustments if necessary.
Proper Cleanup and Tool Storage After Cutting
Although cutting your 2×4 pieces is complete, proper cleanup and tool storage are essential to maintain a safe and efficient workspace.
Start by removing sawdust and debris using a broom or shop vacuum, sweeping floors and surfaces thoroughly. Attaching an auxiliary subplate to support thin veneers and plywood edges can also prevent tear-out in future cuts by creating a zero-clearance opening.
Next, clean the saw blade with a dedicated cleaner and scrub off pitch buildup, ensuring it’s dry to prevent rust. Finally, inspect your circular saw for any damage, test safety features, and organize all tools and accessories in labeled, dry storage areas.
- Remove sawdust and dispose of offcuts safely to avoid hazards.
- Clean and dry blades after use to extend tool life.
- Inspect and store tools neatly, ensuring cords are tangle-free and equipment is protected.
Frequently Asked Questions
What Type of Blade Is Best for Cutting Treated Lumber?
You want a blade designed specifically for treated lumber—look for one with an anti-stick coating to reduce friction and gumming.
Opt for blades with construction-grade carbide teeth, like 40-tooth options, for smoother, cleaner cuts. Brands like Diablo, DEWALT, and BAUER offer reliable blades that handle treated wood well.
Always pick a durable, corrosion-resistant blade to maintain performance and safety while cutting treated lumber.
Can a Circular Saw Cut 2x4s at an Angle or Bevel?
Yes, you can cut 2x4s at an angle or bevel using a circular saw. Adjust the saw’s base plate to the desired bevel angle, usually up to 45 degrees.
Mark both sides of the board carefully with a square or bevel gauge for accuracy. Use a straight edge as a guide, and maintain a steady hand to make certain of a clean cut. Always wear safety gear and secure the wood firmly before cutting.
How to Reduce Splintering on the Cut Edges?
Like an artist protecting a canvas, you can preserve your wood’s finish by applying masking tape along the cut line to stabilize fibers.
Cut with the good face down since the blade exits upwards, causing splintering. Set blade depth just enough to cut through, use a sharp, fine-tooth blade, and consider scoring the line with a utility knife first. Support the wood fully and maintain steady pressure for clean edges.
What Maintenance Does a Circular Saw Need After Heavy Use?
After heavy use, you should clean sawdust and resin buildup from the blade and guard using nylon brushes and specialized cleaners.
Inspect the blade for dullness and replace if needed to maintain cutting quality. Check the power cord and battery for wear or charge.
Lubricate moving parts with dry PTFE lubricant and apply rust protection to metal surfaces. Finally, store your saw and blades in a dry place to prevent corrosion and damage.
Are There Alternatives to Circular Saws for Cutting 2x4s?
If you’re looking for alternatives to circular saws for cutting 2x4s, consider miter saws for precise cross-cuts or bandsaws for curved and straight cuts. Jigsaws offer versatility for both rip and cross-cuts, while hand saws suit manual, precise work.
Reciprocating saws handle rough cuts or tight spaces well. Choose based on your project’s precision, portability needs, and your comfort with the tool to get the best results.
Cutting 2x4s Made Easy: Precision, Safety, and Confidence
Just like a chef sharpens knives before cooking, preparing your circular saw and workspace guarantees every cut on your 2×4 is clean and precise. Remember, accuracy and safety go hand in hand—rushing leads to mistakes, just as a dull blade ruins a meal.
Stick to the steps, use guides, and double-check your setup. With practice, cutting 2x4s will become as straightforward as slicing bread—efficient, safe, and satisfying.