How To Clean Table Saw Top: 7 Steps [Easy DIY]
A well-maintained table saw is essential for achieving accurate cuts and ensuring the longevity of your woodworking equipment. Neglecting regular cleaning and maintenance can compromise your saw’s performance and the precision of your cuts. So, how do you ensure that your table saw top remains in prime condition?
Let me tell you what you must do to keep your table saw running. Regular cleaning of the table saw top ensures reliable and consistent performance. You can clean your table saw with a sander with a fine-grit sandpaper. After that, you have to apply wax and a lubricator to protect the surface from future rust and buildup.
This maintenance process allows you to smooth the operation of adjustability controls. In this guide, I’ll explain the step-by-step process to clean and maintain your table saw top. Get ready to uncover the secrets that will elevate your woodworking game.
How to Clean Table Saw Top: Steps to Follow
Maintaining a clean and well-functioning table saw is crucial for any woodworking enthusiast. When cleaning your table saw top, I’ve concluded a list of important steps you must follow.
- Initial inspection and safety precautions
- Dust and debris removal process
- Rust removal process
- Hard-stain removal process
- Applying paste wax for protection
- Lubrication of the trunnion
- Final inspection and testing
Step 1: Initial Inspection and Safety Precautions
To begin cleaning a table saw top, conduct a thorough inspection and take necessary safety precautions. Start by ensuring that the table saw is unplugged to avoid any accidents. Now remove the throat plate, blade guard, and blade for a more comprehensive examination.
Check for any loose or damaged parts, such as bolts or screws, and promptly address them before proceeding with the cleaning process. Safety should always be a priority, so wear appropriate protective gear such as safety glasses and gloves.
Step 2: Dust and Debris Removal Process
After conducting a thorough inspection and taking necessary safety precautions, I suggest you use an air compressor to blow off sawdust from the table saw top and surrounding areas. This will effectively remove loose particles and make the cleaning process easier.
For a more detailed cleaning, grab a toothbrush and a solvent to clean the trunnion area. Pay close attention to this area as it tends to accumulate residue. By cleaning the trunnion area thoroughly, you can prevent the buildup of sawdust, pitch, and resin inside the cabinet.
Step 3: Rust Removal Process
The best way to remove rust from your table saw top is to use fine-grit sandpaper or abrasive pads with mineral spirits as a lubricant, making sure you use a steady and even stroke.
Begin by gently sanding the affected areas with a drum sander, applying light pressure, and moving in a circular motion. This will help to remove the rust and smooth out the surface.
Use WD-40 or naval jelly for stubborn rust spots, following the instructions carefully. Apply a small amount of the product to a cloth or sponge and gently rub the rusted area.
Be sure to rinse and dry the surface thoroughly after using these products to prevent any residue from causing further damage.
Step 4: Hard-Stain Removal Process
Now that the rust has been successfully removed from the table saw top, it’s time to address any hard stains that may be present. One common type of stain you may encounter is drink rings. These can be easily cleaned by using naphtha after sanding.
Naphtha is a solvent that breaks down grease and leaves a clean cast-iron surface. Simply apply a small amount of naphtha to a clean cloth and gently rub the stained area. Once the stain is removed, wipe the table saw top with a clean cloth to remove any residue.
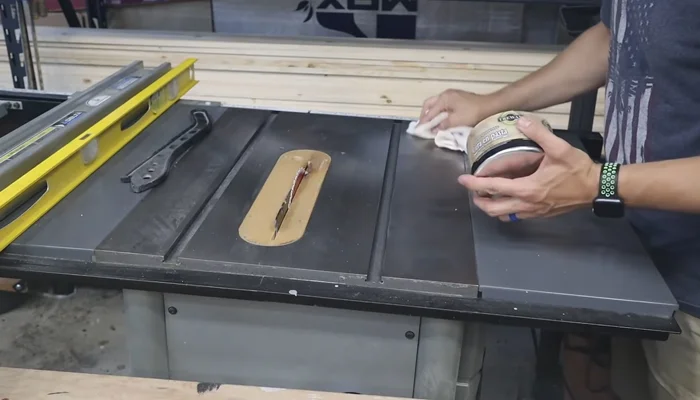
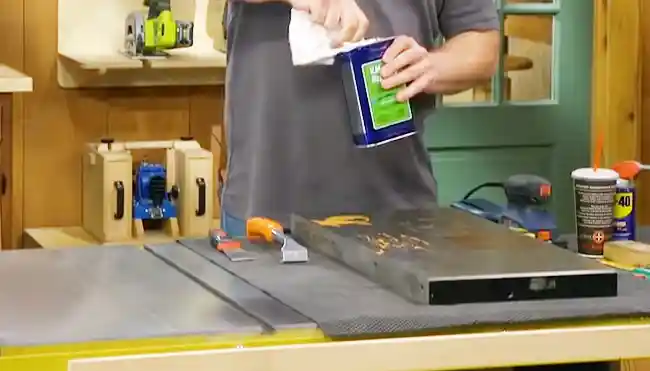
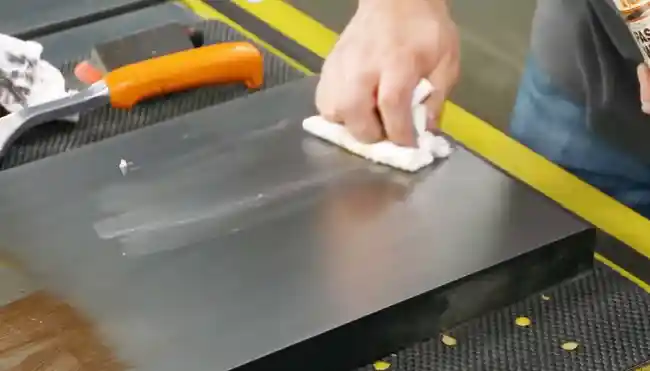
Step 5: Applying Paste Wax for Protection
For optimal protection against rust and smoother adjustments, I recommend applying a coat of paste wax to the table saw top and other parts, such as the fence rails. Paste wax not only acts as a barrier against moisture and corrosion but also provides a slippery surface for easy movement and adjustments.
To ensure proper application, clean the surface thoroughly and remove any debris or residue. Then, spread paste wax in a taller grain pattern using a clean cloth or applicator to cover the entire surface evenly. Follow the instructions provided by the wax manufacturer for drying and buffing.
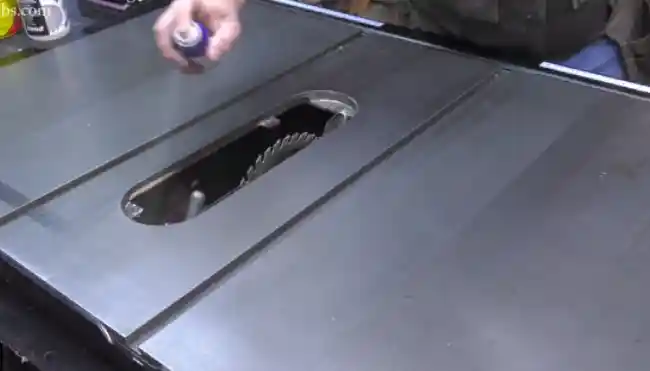
Step 6: Lubrication of the Trunnion
After applying paste wax for protection, the next step in cleaning a table saw top is lubricating the trunnion. Use a dry lubricant specifically designed for this purpose. Avoid lacquer thinner, as it can strip paint off the metal and harm bearings.
Dry lubricants are preferable because they don’t attract dust and chips, ensuring a clean and smooth operation. To lubricate the trunnion, simply spray the dry lubricant onto a clean cloth and then wipe it onto the trunnion surfaces.
Be sure to cover all areas that come into contact with the table saw blade. This will help to reduce friction and promote a smooth movement of the trunnion, ensuring optimal performance of your table saw.
Step 7: Final Inspection and Testing
Perform a thorough inspection of all reassembled parts to ensure they’re securely in place and ready for use. Start by ensuring the throat plate and blade are properly installed and aligned.
Ensure that all screws and bolts are tightened securely, as loose parts can compromise the safety and performance of the table saw. Look for signs of damage or wear, such as cracks or chips in the table surface or other components.
Aside from that, ensure the fence is correctly positioned and locked in place. Once you have completed the inspection, it’s time to test the table saw. Grab a piece of scrap wood and make a few cuts to ensure that the saw is operating smoothly and that the cuts are accurate.
Why Do You Need to Clean Table Saw Tops?
A table saw is the heartbeat of any woodworking shop, and its performance relies heavily on the condition of the table saw top. I have listed the top six reasons for cleaning a table saw top to ensure precision in every cut.
Precision in Every Cut
Regularly cleaning the table saw top is essential for maintaining the precision and accuracy of your cuts. The cleanliness of the table top directly affects the quality of your woodworking projects.
Sawdust, pitch, and resin buildup can throw off the alignment of the saw blade, resulting in inaccurate cuts. These particles can also create uneven surfaces, causing your workpiece to wobble during cutting, leading to imprecise results.
Keeping the table saw top clean ensures a smooth and flat surface for your workpiece to glide across, allowing for precise cuts every time. A clean table saw top also reduces the risk of kickback, where the workpiece gets caught and forcefully thrown back towards you.
Smooth and Consistent Sliding Performance
Maintaining a clean table saw top is crucial for smooth and consistent sliding performance during woodworking projects. When your table saw top is covered in dust and debris, it can cause friction and hinder the smooth movement of the wood across the surface.
This can result in uneven cuts or even jams, compromising the quality of your work. Regularly cleaning your table saw top and keeping it free from sawdust and other contaminants ensures reliable and consistent performance.
In my opinion, the smooth sliding action allows for precise and accurate cuts, enhancing the overall quality of your woodworking projects. So, make it a habit to clean your table saw top before every use to maintain optimal sliding performance and achieve professional results.
Maintenance of Adjustability Controls
Cleaning the table saw top regularly is essential for ensuring the smooth operation of the adjustability controls and maintaining optimal performance.
Neglecting regular cleaning can lead to difficulty adjusting controls on your table saw. Sawdust and debris can accumulate in the trunnion area, making it challenging to make precise adjustments.
Routine cleaning, including using a toothbrush and solvent in this crucial area, ensures that your adjustment controls remain responsive and easy to use.
Prevention of Rust and Corrosion
To ensure the longevity and performance of your table saw, prevent rust and corrosion on the table saw top. Table saw tops are typically cast iron, which is susceptible to rust. Moisture, especially in non-climate-controlled areas, can lead to rust buildup.
Rust affects the appearance of the table saw top and can hinder its functionality. So I suggest cleaning the table saw top and applying protective measures, such as paste wax, which acts as a barrier against rust, preserving the integrity of the metal surface.
Extended Tool Lifespan
Regular maintenance and cleaning of your table saw top is essential for prolonging the lifespan of your tool and ensuring optimal performance.
A well-maintained table saw is a long-lasting one. Regularly cleaning your table saw top removes sawdust and other debris that could contribute to wear and tear on moving parts. This helps prevent premature repairs or replacements, saving time and money.
Additionally, lubricating the trunnion and applying protective coatings, such as paste wax, contribute to the overall longevity of your table saw. These measures help prevent rust and corrosion, damaging your tool and affecting its performance.
What is the best treatment for table saw tops?
For optimal maintenance and protection of your table saw top, the best treatment is to utilize SC Johnson Paste Wax. I highly recommend this wax, as it provides protection against rust and makes the panels easier to handle.
Applying the paste wax to the saw top at least twice a month is suggested unless heavy cutting is done. By doing so, you can ensure that your saw top remains in optimal condition for longer.
Does vinegar dissolve table saw surface rust?
If you’re looking for an effective solution to dissolve surface rust on your table saw top, vinegar can provide a convenient and powerful solution. From my standpoint, applying vinegar to rust can dissolve the oxide and leave behind a water-soluble salt that’s easy to remove.
This process is known as neutralization, and it occurs when rust reacts with acetic acid, which is present in vinegar. The acetic acid breaks down the iron oxides, allowing you to easily wipe away the rust and restore the surface of your saw top.
To use vinegar for rust removal, pour a small amount of vinegar onto a clean cloth or sponge. Gently rub the vinegar onto the rusty areas of your table saw top, ensuring that the surface is evenly coated.
Let the vinegar sit on the rust for a few minutes to allow it to penetrate and dissolve the oxide. Then, use a clean cloth or sponge to wipe away the vinegar and rust residue. Repeat the process if necessary until the rust is completely removed.
Achieve Precise and Reliable Cuts With a clean and Rust-Free Table Saw
Maintaining a clean and rust-free table saw top is crucial for your tool’s performance and longevity. By following the steps outlined in this guide and using the recommended treatment, you can ensure optimal cutting accuracy and safety.
Whether you are a seasoned woodworker or a hobbyist, a clean table saw top ensures that your tool remains a reliable and precise companion in your woodworking projects.
So, don’t let neglect and rust compromise the quality of your work. Take the time to clean and care for your table saw top; it will reward you with precise and reliable cuts for years.